OEM 737-800 Lights Test Toggle Switch - Wired and Installed to MIP

OEM Lights Test Switch (before cleaning...) One toggle switch that comprises several switches

The lights test is an often misunderstood but simple procedure.  The light test is carried out by the crew before each flight to determine if all the annunciators are operating correctly (illuminating).  The crew will toggle the switch upward to lights test followed by a routine scan of each annunciator on the overhead, center pedestal and instrument panel.  An inoperative light may preclude take off.

The lights test switch is a three-way switch which can be placed (and locked) in one of three positions; it is not a momentary switch.  Toggling the switch upwards (lights test) illuminates all annunciators located in the MIP, forward and aft overhead and fire suppression panel (wheel well annunciator may not illuminate), while the central position (BRT) provides the brightest illumination for the annunciators (normal operation).  Toggling the switch downwards activates the DIM function dimming the brightness by roughly half that observed when the toggle is in BRT mode.

Depending upon which manufacturer’s Main Instrument Panel (MIP) you are using, the toggle switch may not function this way.  For example, Flight Deck Solutions (FDS) provide a three-way momentary toggle which is not the correct style of switch.  You should not have to hold the toggle to light test as you make your pre-flight scan.  The real toggle switch in the Boeing 737 aircraft is not a momentary switch.

Anatomy of the Toggle Switch

The OEM Light Test switch may appear to be a ‘glorified’ toggle switch with an aviation-sized price tag; however, there is a difference and a reason for this high price tag.  

The switch although relatively simple in output, encompasses 18 (6+6+6) high amperage individual switches assigned to three terminals located on the rear of the switch.  Each terminal can be used to connect to a particular aircraft system, and then to each other.  This allows the toggle switch to turn on or off multiple aircraft systems during the light test. 

The purpose of these multi-terminals is to allow the toggle switch to cater towards the high amperage flow of several dozen annunciators being turned on at any one time during the lights test, in addition to generators and other aircraft systems that are not simulated in Flight Simulator.  In this way, the switch can share the amperage load that the annunciators draw when activated during the light test.

The switch can control the annunciators (korrys) for the MIP, forward overhead, aft overhead, fire suppression panel and any number of modules located in the center pedestal.  

OEM Lights Test switch.  The appearance of the OEM switch is not dissimilar to a normal toggle switch; however, the functionality is different in that there are a number of terminals on the rear of the switch to allow multi-system connection

Terminals, Interfacing and Connection

To determine the correct terminals to be used for the light test is no different to a normal toggle-style switch. 

First, ascertain which of the six terminals correlate to the switch movement (toggle up, center and down).  The three unused terminals are used to connect with other systems in the real aircraft (not used in Flight Simulator).

To determine the correct terminals for wiring, a multimeter is set to conductivity (beep) mode.  Place one of the two multimeter prongs on a terminal and then place the other prong on the earth (common) terminal.  Gently move the toggle.   If you have the correct terminal for the position of the toggle, the multimeter will beep indicating an open circuit. The toggle switch does not require a power source, but power is required to illuminate the annunciators during the lights test.  

For an overview of how to use a multimeter see this post - Flight Deck Builders Toolbox - Multimeter.

Daisy Chaining and Systems

Any annunciator can be connected to the light test function, and considering the number of annunciators that the light test function interrogates, it is apparent that you will soon have several dozen wires that need to be accommodated. 

Rather than think of individual annunciators, it is easier to relate a group of like-minded components as a system.  As such, depending upon your simulator set-up, you may have the MIP annunciators as one system, the overhead annunciators as another and the fire suppression panel and modules mounted in the center pedestal as yet another.  If these components are daisy chained together (1+1+1+1+1=connection), only one power wire will be required to be connected at the end of the array.  This minimises the amount of wire required and makes connection easier with the toggle switch.

Two Methods to Connect to the Switch

There are two ways to wire the switch; either through the flight avionics software (software-based solution), or as a stand-alone mechanical system.  There is no particular benefit to either system.  The software solution triggers the lights test by opening the circuit on the I/O cards that are attached to the computer, while, the mechanical system replicates how it is done in the real aircraft.

Switch in-line (software connection using ProSim737)

The on/off terminal of the toggle switch is connected to a Leo Bodnar card or other suitable card (I use a Flight Deck Solutions System card), and the card’s USB cable connected to the main computer.  Once the card is connected, the avionics suite software (ProSim737) will automatically register the card with to allow configuration.  Depending upon the type of card used, registration of the inputs and outputs for the card may first need to be registered in Windows (if using Windows 7/10, type into the search bar joystick and then select calibration).

To configure the toggle switch in ProSim737, open the configuration/switches tab and scroll downward until you find the lights test function.  Open the tab beside the name; select the appropriate interface card (Leo Bodnar card) from the drop down menu and save the configuration.  

ProSim737 will automatically scan the interface cards that are installed, and if there is a card that has a power requirement, such as a Phidget 0/16/16 card (used to convert OEM annunciators, modules and panels), the software will make a connection enabling the lights test to function.

Considering the connection is accomplished within the ProSim737 software, it stands to reason the lights test will only operate when ProSim737 is open.

To illuminate the annunciators when the switch is thrown, a 28 volt power supply will need to be connected to the annunciators either separately or in a daisy chain array.

OEM aviation relay mounted in center pedestal

Stand-alone (mechanical connection)

The second method, which is the way it is done in the real aircraft, is to use an OEM 50 amp 6 pull/6 throw relay. 

Depending upon the type of relay device used (there are several types), it may be possible to connect up to three systems to the one relay.

Lights Test Busbar

Although the lights test toggle switch has the capacity to connect several systems to the actual switch, it would be unmanageable to attempt to connect each panel to the lights test switch.

To solve this issue a centrally-placed aviation-grade relay has been used in association with a busbar.

The benefit of using an OEM relay and busbar is that the relay acts as a central point for all wires to attach.  The wires from the various systems (panels, korrys, etc) attach to the busbar which in turn connects to the various posts on the relay.

When the lights test toggle is positioned to lights test, the relay will open or close enabling power to reach the annunciators (via the busbar).

The stand-alone system will enable the lights test to be carried out without ProSim737 or flight simulator being open.

The OEM relay is not large - the size of a small entree plate, however, it can be problematic finding a suitable area in which to mount the relay where it is out of the way.  A good location is to mount the relay inside the pedestal bay. In my case, the relay is attached to a flat wooden board which is secured to the lower section of the center pedestal.

Using the DIM Functionality (toggle thrown downwards)

This article has only discussed the lights test function of the toggle switch. The DIM function is used to dim the OEM annunciators (korrys) for night work. 


Diagram 1: basic overview to how the oem lights test toggle is connected


diagram 2: flow schematic between oem light test toggle and annunciators


Crosswind Landing Techniques Part Two - Calculations

crosswind landing with right main gear touching first (Jeroen Stroes Aviation Photography from Netherlands, EI-FIZ (27608888537), CC BY 2.0

Determining Correct Landing Speed (Vref)

Vref is defined as landing speed or the threshold crossing speed, while Vapp is defined as the approach speed with wind/gust additives.

When landing with a headwind, crosswind, or tailwind the Vref and Vapp must be adjusted accordingly to obtain the optimal speed at the time of touchdown.  Failure to do this may result in the aircraft landing at an non-optimal speed causing runway overshoot, stall, or floating (ground affect).

Mathematical calculations can be used to determine Vref and Vapp based on wind speed, direction, and gusts.

This is the second segment of a two-segment post.  The first segment dealt with methods used to land in cross wind conditions  - Crosswind Landing Techniques Part One Crab and Sideslip.

Normal Conditions

When using the autothrottle, position command speed to Vref+5 knots.

If the autothrottle is disengaged or is planned to be disengaged prior to landing, the recommended method of approach speed correction to obtain Vapp (approach speed), is to add one half of the reported steady headwind component plus the full gust increment above the steady wind to the reference speed.

One half of the reported steady headwind component can be estimated by using 50% for a direct headwind, 35% for a 45-degree crosswind, zero for a direct crosswind, or interpolation between.

When making adjustments for wind additives, the maximum command speed should not exceed Vref+20 knots or landing flap placard speed minus 5 knots, whichever is lower.

The minimum command speed setting with autothrottle disconnected is Vref+5 knots.  The gust correction should be maintained to touchdown while the steady headwind correction should be bled off as the airplane approaches touchdown. 

It is important to note that Vref+5 knots is the speed that is desired when crossing the threshold of the runway - it is NOT the approach speed.  The approach speed (Vapp) is determined by headwind with/without gusts.  If the wind is calm, Vref+5 knots will equal Vapp.

When landing in a tailwind, do not apply wind corrections. Set command speed at Vref+5 knots (autothrottle engaged or not engaged).

Non-Normal Conditions

When Vref has been adjusted by the non-normal procedure, the new Vref is called the adjusted Vref and is used for the landing.  To this speed is added the wind component (if necessary).

For example, if a non-normal checklist specifies 'Use flaps 15 and Vref 15+10 for landing', the flight crew would select flaps 15 and look up the Vref 15 speed (in FCTM or QRH) and add 10 knots to that speed.  The adjusted Vref does not include wind corrections and these will need to be added.

If the autothrottle is disengaged, or is planned to be disengaged prior to landing, appropriate wind corrections must be added to the adjusted Vref to arrive at command speed.  Command speed is the safest speed used to fly the approach (Vapp).  If the speed is above command speed then it will need to be bleed off prior to touchdown.

Autoland Limitations

If using autoland (CAT II & CAT IIIA) the autothrottle remains engaged and the command speed is set to Vref+5.

The following autoland limitations must be complied with:

  1. Glide slope angle tolerance - maximum 3.25 degrees / minimum 2.5 degrees;

  2. Engines 1/2 operational;

  3. Maximum​ tailwind - 15 kts​;

  4. Maximum headwind - 25 kts​;

  5. Maximum crosswind - 20​ kts ;

  6. Maximum tailwind at flaps 30 - 12 knots (winglets); and,

  7. Landing in gusty​ wind​ or windshear​ conditions is not approved during CAT II and CAT IIIA operations.

Guideline (an easy way to remember the above - cheat sheet)

This information assumes the autothrottle will be disengaged prior to landing.

  • Headwind less than 10 knots:  Vref+5

  • Headwind greater than 10 knots:  Vref +headwind / 2 (half your headwind) - This is your Vref

  • If Vref is > 20 knots, then:  Vref+20 (as per placard guide)

With Gusts

  • Formula (Wind < 10 knots):  Vref+5 + gust – headwind

  • Formula (Wind > 10 knots):  Vref + headwind/2 (half your headwind) + gust – headwind

Calculating Directional Wind

A wind component will not always be at 90 Degrees or straight on to your landing direction.  The following calculation is often used to determine the directional component.  One half of the reported steady headwind component can be estimated by using 50% for a direct headwind, 35% for 45 degree crosswind, zero for a direct crosswind and interpolation in between.

Tail Winds

Tail winds are very challenging for conducting a stabilized approach.  Because of the increased ground speed caused by a tail wind, Boeing does not publish Vref correction factors for tail winds. 

Typically, to maintain the proper approach speed and rate of descent while maintaining glide slope, thrust must be decreased which minimizes the available safety envelope should a go-around be required.  If a go-around is required, precious seconds might be lost as the engines accelerate; the aircraft would continue to descend and might touch down on the runway before the engines produce enough thrust to enable a climb.

The International Civil Aviation Organization (ICAO) recommends that the tail wind component must not exceed 5 knots plus gusts on a designated runway; however, adherence to this recommendation varies among members.  Several airlines have been certified for operation with a 15 knot tailwind. 

In the United States, Federal Aviation Administration (FAA) sets the tail wind component limit for runways that are clear and dry at 5 knots, and in some circumstances 7 knots, however FAA allows no tail wind component when runways are not clear and dry.  Note, that many manuals subscribe to the 10 knots no tailwind rule (see table below).

Crosswind components can be variable dependent upon flight crew discretion and airline policy; therefore, the above is to be used as a 'guide' only.

The below table (limitations) summarizes much of what has been written above.


table 1: wind limits for 737-800. the table provides a good summary of what has been written in the article


The CDU if configured correctly can provide information concerning wind components.  Press the key on the CDU named 'PROG' followed by 'PREV PAGE'.  This page provides an overview of the wind component including head, tail and crosswind.

Wind Correction Field (WIN CORR)

The approach page in the CDU has a field named WIN CORR (Wind Correction Field or WCF).  Using this field, a flight crew can alter the Vref+ speed (additive) that is used by the autothrottle.  The default reading is +5.   Any change will alter how the FMC calculates the command speed that the autothrottle uses; changes are reflected in the LEGS page.  It's important to update the WIND CORR field if VNAV is used for the approach, as VNAV uses data from the FMC to fly the approach.  If hand flying the aircraft, it's often easier to to add the Vref additive to the speed window in the MCP.

WIND CORR Explained

The WCF is a handy feature if a flight crew wishes to increase the safety margin the autothrottle algorithm operates.

Boeing when they designed the autothrottle algorithm programmed a speed additive that the A/T automatically adds to Vref when the A/T is engaged.  The reason for adding this speed is to provide a safety buffer to ensure that the A/T does not command a speed equal to or lower than Vref.   (recall that wind gusts can cause the autothrottle to spool up or down depending upon the gust strength).  

A Vref+ speed higher than +5 can be inputted when gusty or headwind conditions are above what are considered normal.  By increasing the +speed, the  speed commanded by the autothrottle will not degrade to a speed lower than that inputted.

Important Points:

  • During the approach, V speeds are important to maintain.  A commanded speed that is below optimal can be dangerous, especially if the crew needs to conduct a go-around, or if winds suddenly increase or decrease.  An increase or decrease in wind can cause pitch coupling.

  • If using VNAV, it's important to update the WIND CORR field to the correct headwind speed based on conditions.  This is because VNAV uses the data from the FMC.

If executing an autoland (rarely done in the B737), the WIND CORR field is left as +5 knots (default).  The autoland and autothrottle will command the correct approach and landing speed.

Crosswind Landing Techniques Part One - Crab and Sideslip


This video very clearly illustrates my point that landing in a strong crosswind can be a challenging and in some cases downright dangerous (Video © CargoSpotter (with thanks); courtesy U-Tube).

Generally, flight crews use one of two techniques or a combination thereof to approach and land in crosswind conditions.  If winds exceed aircraft tolerances, which in the 737-800 is 33 knots (winglets) and 36 knots (no winglets), the flight crew will divert to their alternate airport (Brady, Chris - The Boeing 737 technical Guide).

crab approach. Wind is right to left at 16 knots with aircraft crabbing into the wind to maintain centerline approach course.  Just before flare, left rudder will be applied to correct for drift to bring aircraft into line with centerline of runway.  This technique is called 'de-crabbing’. During such an approach, the right wing may also be lowered 'a tad' (cross-control) to ensure that the aircraft maintains the correct alignment and is not blown of course by a 'too-early de-crab'.  Right wing down also ensures the main gear adheres to the runway during the roll out

Maximum crosswind figures can differ between airlines and often it's left to the pilot's discretion and experience.  Below is an excerpt from the Landing Crosswind Guidelines from the Flight Crew Training Manual (FCTM).  Note that FCTMs can differ depending on date of publication.

There are several factors that require careful consideration before selecting an appropriate crosswind technique: the geometry of the aircraft (engine and wing-tip contact and tail-strike contact), the roll and yaw authority of the aircraft, and the magnitude of the crosswind component.  Consideration also needs to be made concerning the effect of the selected technique when the aircraft is flared to land.

Crosswind Approach and Landing Techniques

There are four techniques used during the approach and landing phase which center around the crab and sideslip approach.  The crab and sideslip are the primary methods and most commonly used while the de-crab and combination crab-sideslip are subsets that can be used when crosswinds are stronger than usual.

It must be remembered that whatever method is used it is at the discretion of the pilot in command.

  1. Crab (to touchdown).

  2. Sideslip (wing low).

  3. De-crab during flare.

  4. Combination crab and sideslip.

1:  Crab (to touchdown)

  • Airplane maintains a crab during the final approach phase.

  • Airplane touches down in crab.

  • Flight deck is over upwind side of runway (Main gear is on runway center).

  • Airplane will de-crab at touchdown.

  • Flight crew must maintain directional control during roll out with rudder and aileron.

With wings level, the crew will use drift correction to counter the effect of the crosswind during approach.  Drift correction will cause the aircraft to be pointing in a direction either left or right of the runway heading, however, the forward energy of the aircraft will be towards the centerline.  This is called the crab because the aircraft is crabbing at an angle left or right of the aircraft's primary heading.

Most jetliners have the ability to land in a crab, however, it must be remembered that landing in a crab places considerable stress on the main landing gear and tyre side-walls, which in turn can cause issues with tyre and wheel damage, not too mention directional control.

The later is caused by the tandem arrangement of the main landing gear that has a strong tendency to travel in the direction that the nose of the aircraft is pointing at the moment of touchdown.  This can result in the aircraft travelling toward the edge of the runway during the roll out.  To counter this, and align the nose of the aircraft with the centreline of the runway, the pilot flying must apply rudder input when lowering the nose wheel to the runway surface.

A reference to the maximum amount of crab that can be safely applied in the B737 was not found, other than maximum crosswind guidelines must not be exceeded.  The crab touchdown technique is the preferred choice if the runway is wet.

2:  Sideslip (wing low)

  • Upwind wing lowered into wind.

  • Opposite rudder (downwind direction) maintains runway alignment.

  • In a sideslip the aircraft will be directly aligned with the runway centerline using a combination of into-wind aileron and opposite rudder control (called cross-controls) to correct the crosswind drift.

The pilot flying establishes a steady sideslip (on final approach by applying downwind rudder to align the airplane with the runway centerline and upwind aileron to lower the wing into the wind to prevent drift.  The upwind wheels should touch down before the downwind wheels touch down.

The sideslip technique reduces the maximum crosswind capability based on a 2/3 ratio leaving the last third for gusts.  However, a possible problem associated with this approach technique is that gusty conditions during the final phase of the landing may preempt a nacelle or wing strike on the runway.

Therefore a sideslip landing is not recommended when the crosswind component is in excess of 17 knots at flaps 15, 20 and 30, or 23 knots at flaps 40.

The sideslip approach and landing can be challenging both mentally and physically on the pilot flying and it  is often difficult to maintain the cross control coordination through the final phase of the approach to touchdown.  If the flight crew elects to fly the sideslip to touchdown, it may also be necessary to add a crab during strong crosswinds.

3:  De-crab During Flare(with removal of crab during flare)

  • Maintain crab on the approach.

  • At ~100 foot AGL the flight crew will de-crab the aircraft; and,

  • During the flare, apply rudder to align airplane with runway centreline and, if required slight opposite aileron to keep the wings level and stop roll.

This technique is probably the most common technique used and is often referred to as the 'crab-de-crab'.

The crab technique involves establishing a wings level crab angle on final approach that is sufficient to track the extended runway centerline.  At approximately 100 foot AGL and during the flare the throttles are reduced to idle and downwind rudder is applied to align the aircraft with the centerline (de-crab). 

Depending upon the strength of the crosswind, the aircraft may yaw when the rudder is applied causing the aircraft to roll.  if this occurs, the upwind aileron must be placed into the wind and the touchdown maintained with crossed controls to maintain wings level (this then becomes a combination crab/sideslip - point 4).

Upwind aileron control is important, as a moderate crosswind may generate lift by targeting the underside of the wing. Upwind aileron control assists in ensuring positive adhesion of the landing gear to the runway on the upwind side of the aircraft as the wind causes the wing to be pushed downwards toward the ground.

Applied correctly, this technique results in the airplane touching down simultaneously on both main landing gear with the airplane aligned with the runway centerline.

4:  Combination Crab and Sideslip

  • De-crab using rudder to align aircraft with runway (same as point 3 de crab during flare).

  • Application of opposite aileron to keep the wings level and stop roll (sideslip). 

The technique is to maintain the approach in a crab, then during the final stages of the approach and flare increase the into-wind aileron and land on the upwind tyre with the upwind wing slightly low.  The combination of into-wind aileron and opposite rudder control means that the flight crew will be landing with cross-controls.

The combination of crab and sideslip is used to counter against the turbulence often associated with stronger than normal crosswinds.

As with the sideslip method, there is the possibility of a nacelle or wing strike should a strong gust occur during the final landing phase, especially with aircraft in which the engines are mounted beneath the wings.

FIGURE 1:  Diagram showing most commonly used approach techniques (copyright Boeing)

Operational Requirements and Handling Techniques

With a relatively light crosswind (15-20 knot crosswind component), a safe crosswind landing can be conducted with either; a steady sideslip (no crab) or a wings level, with no de-crab prior to touchdown.

With a strong crosswind (above a 15 to 20 knot crosswind component), a safe crosswind landing requires a crabbed approach and a partial de-crab prior to touchdown.

For most transport category aircraft, touching down with a five-degree crab angle with an associated five-degree wing bank angle is a typical technique in strong crosswinds.

The choice of handling technique is subjective and is based on the prevailing crosswind component and on factors such as; wind gusts, runway length and surface condition, aircraft type and weight, and crew experience.

Touchdown Recommendations

No matter which technique used for landing in a crosswind, after the main landing gear touches down and the wheels begin to rotate, the aircraft is influenced by the laws of ground dynamics.

Effect of Wind Striking the Fuselage, Use of Reverse Thrust and Effect of Braking

The side force created by a crosswind striking the fuselage and control surfaces tends to cause the aircraft to skid sideways off the centerline.  This can make directional control challenging.

Reverse Thrust

The effects of applying the reverse thrust, especially during a crab ‘only’ landing can cause additional direction forces.  Reverse thrust will apply a stopping force aligned with the aircraft’s direction of travel (the engines point in the same direction as the nose of the aircraft).  This force increases the aircraft’s tendency to skid sideways.

Effects of Braking

Autobrakes operate by the amount of direct pressure applied to the wheels.  In a strong crosswind landing, it is common practice to use a combination of crab and sideslip to land the aircraft on the centerline.  Sideslip and cross-control causes the upwind wing to be slightly down upon landing and this procedure is carried through the landing roll to control directional movement of the aircraft. 

The extra pressure applied to the ‘wing-down’ landing gear causes increased auto-braking force to be applied which creates the tendency of the aircraft to turn into the wind during the landing roll.  Therefore, a flight crew must be vigilant and be prepared to counter this unwanted directional force.

If the runway is contaminated and contamination is not evenly distributed, the anti-skid system may prematurely release the brakes on one side causing further directional movement.

FIGURE 2:  Diagram showing recovery of a skid caused by crosswind and reverse thrust side forces (source: Flight Safety Foundation ALAR Task Force)

Maintaining Control - braking and reverse thrust

If the aircraft tends to skew towards the side from higher than normal wheel-braking force, the flight crew should release the brakes (disengage autobrake) which will minimize directional movement.  

To counter against the directional movement caused by application of reverse thrust, a crew can select reverse idle thrust which effectively cancels the side-force component.  When the centerline has been recaptured, toe brakes can be applied and reverse thrust reactivated.

Runway Selection and Environmental Conditions

If the airport has more than one runway, the flight crew should land the airplane on the runway that has the most favourable wind conditions.  Nevertheless, factors such as airport maintenance or noise abatement procedures sometime preclude this.

I have not discussed environmental considerations which come into play if the runway is wet, slippery or covered in light snow (contaminated).  Contaminated conditions further reduce (usually by 5 knots) the crosswind component that an aircraft can land.

Determining Correct Landing Speed (Vref)

Vref is defined as landing speed or threshold crossing speed.

When landing with a headwind, crosswind, or tailwind the Vref must be adjusted accordingly to obtain the optimal speed at the time of touchdown.  Additionally the choice to use or not use autothrottle must be considered. Failure to do this may result in the aircraft landing at a non-optimal speed causing runway overshoot, stall, or floating (ground affect).

This article is part one of two posts.  The second post addresses the calculations required to safety land in crosswind conditions: Crosswind Landing Techniques Part Two Calculations.

OEM Brackets to Secure Gauges and Modules to Boeing 737 MIP

oem brackets. brackets for different sized modules and gauges.  The brackets when tightened provide a snug and secure fit for any OEM gauge or module

Original Equipment Manufacturer (OEM) parts usually attach to the infrastructure of the flight deck by the use of DZUS fasteners.  The easy to use fasteners allow quick and easy removal of panels and modules.  But what about the gauges that are used in the Main Instrument Panel (MIP); for example, the yaw dampener, brake pressure and AFDS module.

These items do not use DZUS fasteners for attachment to the MIP; rather they are inserted into the MIP from the front and secured from behind by a specially designed bracket.  The different sized brackets are made from lightweight aluminum and are designed to fit particular gauges and modules.   Each bracket incorporates, depending on the style, a number of screws.  These screws are used to loosen or tighten the bracket. 

The gauge is inserted into the MIP from the front.  The bracket is then placed over the gauge from behind the MIP and tightened by one or more of the resident screws.  The screws cause the bracket to clamp tightly to the shaft of the gauge and ‘sandwich’ the MIP between the flanges of the gauge and the edge of the bracket.  Once fitted, the Canon plug is then re-attached to the gauge.

selection of oem and reproduction gauges (flaps is reproduction)

Of interest is that some brackets have been designed to fit the differing thicknesses between MIPs.  By turning the bracket end on end the appropriate thickness of the MIP is selected.  

As mentioned above, the brackets are designed to fit specifically sized and shaped gauges and modules; therefore, it is important to purchase the bracket that fits the gauge you are using.  There are several different sized brackets on the market that are used in the Boeing 737 classics and NG airframes.  The 'NG' for the most part incorporates identically sized gauges as the classics, so a bracket is not necessarily NG specific.

One of the benefits in using the OEM brackets is that they are designed for the purpose, are very easy to install, and facilitate the quick removal of a gauge or module should it be necessary.

In the next post we look more at flight training and discuss crosswind landings.

Approach Tools: Vertical Bearing Indicator, Altitude Range Arc and Vertical Deviation Scale

On 12 February 2012, the flight crew of a Boeing 737 aircraft, registered VH-TJS and operated by Qantas Airways Limited, was conducting a scheduled passenger service from Sydney, New South Wales to Canberra, Australian Capital Territory. Due to scheduled maintenance the instrument landing system at Canberra was not available and the crew prepared for an alternate instrument approach that provided for lateral but not vertical flight path information. The flight was at night with rain showers and scattered cloud in the Canberra area.

Shortly after becoming established on the final approach course with the aircraft’s automatic flight system engaged, the flight crew descended below the minimum safe altitude for that stage of the approach. The crew identified the deviation and leveled the aircraft until the correct descent profile was intercepted, then continued the approach and landed. No enhanced ground proximity warning system alerts were generated, as the alerting thresholds were not exceeded.

During those phases of flight when terrain clearance is unavoidably reduced, such as during departure and approach, situation awareness is particularly crucial. Any loss of vertical situation awareness increases the risk of controlled flight into terrain. This occurrence highlights the importance of crews effectively monitoring their aircraft’s flight profile to ensure that descent is not continued through an intermediate step-down altitude when conducting a non-precision approach (Australian Transport safety Bureau, 2013).

Determining the correct rate of descent (RoD) or vertical speed (V/S) is a critical attribute if an aircraft is to arrive at the correct altitude and avoid excessive descent rates.  Control of the vertical path uses two different methods: the step-down method and the constant descent method.  Both methods assume that the aircraft is being flown in landing configuration at the final approach speed (VaPP) from the final approach fix (FAF) to the landing initiation of the missed approach.

Non Precision Approaches (NPA)

Historically non precision approaches reference ground navigation aids that exhibit a degree of inaccuracy, which is often enhanced by the poorly defined vertical path published on an approach chart; NPA charts typically provide only an assigned altitude at the FAF and the distance from the FAF to the MAP.  Thus, flight crew awareness of the aircraft’s vertical position versus the intended vertical path of the final approach can be quite low when executing traditional style step-down approaches.

To determine the best vertical speed to use during a non precision approach, flight crews use a number of 'back of the envelope' calculations.

Rate of Descent & Glideslope Calculations

There are several calculations that can be used determine rate of descent – some more accurate than others.  Search ‘determine descent rate’ in Google.  Some of the more commonly used rules of thumb are:

  • Divide your ground speed by 2, then add a zero (120 kias / 2 = 60, add 0 = 600 fpm).

  • Rate of descent (RoD) in ft/min should be equal to 5 times the ground speed in knots (same as above but different calculation).

  • To maintain a stabilized approach, add a zero to your indicated air speed and divide by two (150 kias + 0 = 1500 / 2 = 750 fpm).

  • To determine distance from threshold to start a 3 degree glideslope, take the height above ground level and divide by three hundred (600 ft AGL / 300 = 2 nm).

  • To maintain a 3 degree glideslope (ILS), multiply your ground speed by 5.  The resulting number is the rate of descent to fly (110 kias x 5 + 550 fpm on 3 degree glideslope).

  • If the glideslope is not operational on an ILS approach with DME, multiply the distance ‘to go’ by 300.  This will provide the height in feet above the threshold of the runway (4 nm to the threshold; multiply x 300 = 1200 ft).

Flight crews today, especially those flying in and out of busy intercity hubs, rarely execute step down approaches as computer and GPS-orientated systems have replaced traditional methods of navigation.  However, as the flight into Canberra revealed, the best system may at times be inoperative or fail and it is good airmanship to understand and be able to remember one or more of the above equations. 

Today's systems provide a high level of redundancy and the Boeing 737-800 NG incorporates a number of integrated aids to assist a flight crew during descent and approach.  In this post some of less commonly understood aids will be discussed.

CDU showing DES Page, waypoint/altitude and VBI interface (Key RSK3 & RSK4)

Vertical Bearing Indicator (VBI))

A tool often overlooked with regard to positional awareness is the Vertical Bearing Indicator (VBI). The VBI display is accessed and displayed in the CDU. 

The VBI can calculate an accurate rate of descent to a particular spatial point.  It is basically an angle calculator that provides ‘live’ vertical speed information based upon a desired descent angle, the current speed of the aircraft and an end location.

A flight crew enters into the VBI the final altitude that the aircraft should be at (for example, the Final Approach Fix or runway threshold). This figure is determined by consulting the appropriate approach chart for the airport.  The CDU will then calculate the descent rate based on flight variables.  As the aircraft descends, the VBI readout will continually update the descent rate based upon aircraft speed and rate of descent.

The flight crew can either manually fly the descent rate or use part or full automation to maintain the rate of descent.  A common method is to use the Vertical Speed (V/S) function on the MCP.

It is important to understand that the VBI has nothing to do with VNAV.  The VBI takes the raw distance between the aircraft and a selected altitude point and calculates a vertical bearing to that point.  If that point is part of a route in the CDU, then the next altitude constraint will be displayed, unless the user changes this.

Accessing the VBI

Navigate to Descent page on the CDU by pressing the DES key.

At lower right hand side of the DES page you will see the following: FPA, V/B, V/S.  This is the Vertical Bearing Indicator.

Key RSK3 (right line select 3) allows manual entry of a waypoint and altitude or altitude restriction.  Type the waypoint and altitude separated by a / slash symbol into the scratchpad of the CDU and upload to the correct line. (for example, MHBWM/200).

The VBI provides three fields:

  1. FPA (Flight Path Angle). This is the vertical path in degrees (angle of descent) that the aircraft is currently flying.

  2. V/B (Vertical Bearing). This is the computed vertical path in degrees that the aircraft SHOULD be flying to reach the CDU waypoint or altitude restriction.

  3. V/S (Vertical Speed). This is the vertical bearing (V/B) converted into a vertical speed (RoD) for easy input into the MCP.  The V/S is the vertical speed (RoD in feet per minute) required to achieve the displayed vertical bearing (VB).

Observe the vertical bearing.  The idle descent in a 737 is roughly 3.0 degrees.  Wait until the V/B moves between 2.7 and 3.0 degrees (or whatever descent angle you require based upon your approach constraints) and note the descent rate (V/S).  At its simplest level, the V/S can be entered directly into the MCP and is the rate of descent required to achieve the computed vertical path. 

If using automation, it will attempt to follow the vertical bearing calculated and displayed on the CDU. For example, if a VNAV descent is activated before the Top of descent (ToD) is reached, the Flight Management System (FMS) commands a 1250 fpm descent rate until the displayed V/B is captured. This is done while maintaining a VNAV connection.

Important Points:

  • The VBI can be used for any waypoint, fix and altitude and acts in conjunction with the AFDS

  • The vertical bearing when the aircraft is on final approach calculates data from the Final Approach Fix (FAF) to the runway threshold.

737-800 Altitude Range Arc and Vertical Deviation Scale and Pointer

Other Approach Aids

Altitude Range Arc (ARA)

A handy feature often overlooked is the Altitude Range Arc (ARA).  The ARA is a green coloured half semicircle which can be viewed on the Navigation Display (ND).  The ARA indicates the approximate map position where the altitude, as set on the mode control panel is expected to be reached.  Once the aircraft is well established on the vertical bearing (V/B) calculated by the CDU, the ARA semicircle should come to rest on the targeted waypoint.  

Vertical Deviation Scale and Pointer (VDS)

The Vertical Deviation Scale is another feature often misunderstood.  The scale can be found on the lower right hand side of the Navigation Display (ND).

The VDI will be displayed when a descent and approach profile is activated in the CDU (such as when using VNAV).  However, the tool can be used to aid in correct glideslope for any type of approach (RNAV, VNAV, VOR, etc).  To display the VDI, an appropriate approach be selected in the CDU; however, the flight crew fly a different type of approach without VNAV engaged).

The Vertical Deviation Scale presents the aircraft’s vertical deviation from the flight management computer’s determined descent path (vertical bearing) within +- 400 feet.  It operates in a similar way to the Glideslope Deviation Scale on the Instrument Landing System (ILS).

The VDS is a solid white-coloured vertical line with three smaller horizontal lines at the upper, lower and middle section, on which a travelling magenta-coloured diamond is superimposed.  The middle horizontal line represents the aircraft’s position and the travelling diamond represents the vertical bearing (V/B). 

When the aircraft is within +- 400 feet of the vertical bearing the diamond will begin to move, indicating whether you are above, below or on the V/B target.  When the aircraft is on target (middle horizontal line) with the indicated vertical bearing, the FMA will annunciate IDLE thrust mode followed by THR HLD as the aircraft pitches downwards to maintain the V/B.

In some literature this tool is referred to as the Vertical Track Indicator (VTI).

Vertical Development (VERT DEV)

The Vertical Development (VERT DEV) is the numerical equivalent of the vertical deviation scale and is found on the Descent Page of the CDU.  The VERT DEV allows a flight crew to cross check against the VBI in addition to obtaining an accurate measurement in feet above or below the targeted vertical bearing. The VERT DEV will display HI or LO prefixed by a number which is the feet the aircraft is above or below the desired glideslope.

The Vertical Deviation Scale and pointer (VDS) will remain visible on the Navigation Display (ND) throughout the approach, and in association with the Vertical Development display on the CDU are important aids to use for Non Precision Approaches (NPA). 

Final Call

The traditional method of a step down approach, which was the mainstay used in the 1970s has evolved with the use of computer systems and GPS.  In the 1980s RNAV (area navigation) approaches with point to point trajectories began to be used, and in the 1990s these approach procedures were further enhanced with the use of Required Navigational Performance (RNP) in which an aircraft is able to fly the RNAV approach trajectory and meet specified Actual Navigation Performance (ANP) and RNP criteria.  From the 1990s onward with the advent of GPS, the method that non precision approaches are flown has allowed full implementation of the RNP concept with a high degree of accuracy.

Although the nature of non precision approaches has evolved to that of a 'precision-like' approach with a constant descent angle, their are operators that widely use these techniques, despite their flaws, weaknesses and drawbacks. Even if modern navigational concepts are used in conjunction with traditional methods, aids such as the VBI, ASR and VDI should not be overlooked.  Appropriate cross checking of the data supplied by these aids provides an added safety envelope and avoids having to remember, calculate and rely on ‘back of the envelope’ calculations.

The flight crew landing in Canberra, Australia did not use all the available aids at their disposal.  If they had, the loss of vertical situational awareness may not have occurred.

Abbreviations

  • ANP - Actual Navigation Performance

  • ARA - Altitude Range Arc

  • CDU – Control Display Unit (used by the flight crew to interface the with the FMC)

  • FAF - Final Approach Fix

  • FMS – Flight Management System

  • FMA – Flight Mode Annunciation

  • FMC – Flight Management Computer (connects to two CDU units)

  • ILS – Instrument Landing System

  • KIAS - Knots Indicated Air Speed

  • MAP - Missed Approach Point

  • MCP – Mode Control Panel

  • ND – Navigation Display

  • NPA – Non Precision Approach

  • RoD – Rate of Descent

  • RNP - Required Navigation Performance

  • RNAV - Area Navigation

  • ToD – Top of Descent

  • V/B – Vertical Bearing

  • VBI – Vertical Bearing Indicator

  • V/S – Vertical Speed

  • VDS – Vertical Deviation Scale and pointer (also called Vertical Track Indicator)

  • VERT DEV – Vertical Development

B737-800 AFDS Unit - Converted and Installed to MIP

OEM AFDS and bracket is a solid piece of engineering.  it looks like a small 'brick'.  The three angled annunciators can easily be seen in the photograph as can the attachment bracket and screws

The Autopilot Flight Director System (AFDS) is located on the Main Instrument Panel (MIP).  There are two identical units; one situated the Captain-side and the other on the First officer-side. 

The AFDS is one of several components belonging to the Automatic Flight System (AFS) and is also referred to as the autoflight annunciator and autopilot/autothrottle indicator.  The FMC annunciator is often referred to as the FMC alerting indicator.

The purpose of the unit is two-fold; to provide the flight crew with a visual warning of disengagement of the Autopilot and Autothrottle, to an alert on the FMC, and to enable the resetting of and testing of the unit (light test). 

The unit has two annunciation colours, red and amber in either a flashing or steady state which correspond to either an alerting or advisory messages.  Red precedes Amber in the level of importance.  The A/P and A/T annunicators have dual colour capability while the FMC annunciator displays only amber.

This unit was removed from an United Airlines Boeing 737.  On inspection, it was observed that the toggle was slightly bent.  The bent toggle may have been the reason why the part was scrapped; it failed certification. The toggle was easily straightened.

Conditions for Operation

There are four operating conditions:

1:    Autopilot (A/P) Disengage Light

The annunciator will flash RED if either the autopilot or autothrottle is disengaged. The former will also trigger the A/P disengaged tone (whoop, whoop, whoop).  To extinguish the flashing light and reset the unit, the flight crew must push either of the two annunciators (A/P P/RST or A/T P/RST) or press the yoke disengage switch twice.

The annunciator will illuminate a steady RED in any of the following conditions:

  • The stabilizer is out of trim below 800 feet RA on a duel channel approach

  • The ALT ACQ mode is inhibited during an autopilot go-around (is stabilizer not trimmed correctly)

  • The disengage light test switch is held in position 2, or

  • The automatic ground system fails.

The annunciator will illuminate flashing AMBER when the autopilot automatically reverts to CWS pitch or roll mode while the in Command (CMD).   To extinguish the light, press either the A/P P/RST annunciator or press another mode of the MCP.

The annunciator will illuminate steady AMBER when the light test switch is held in position 1, or when a downgrade in autoland capability occurs.

2:  Autothrottle (A/T) Disengage Light

The annunciator will illuminate flashing RED if the autothrottle (A/T) is disengaged.

The annunciator will illuminate steady RED if the light test switch is held in position 2.

The annunciator will illuminate flashing AMBER to indicate an autothrottle airspeed error exists under either of the following conditions:   

  • Inflight

  • Flaps not up, or

  • Airspeed differs from the commanded value by +10 or -5 knots and is not approaching the commanded value.

The annunciator will illuminate steady AMBER if the light test switch is held in position 1.

3:  Light Test Switch

The AFDS is not connected to the main light test toggle; therefore, it’s equipped with its own light test switch.  The central spring-loaded toggle is used to determine if the unit is operational. 

If the toggle is pushed toward TEST 1, it will illuminate the autopilot, autothrottle and FMC alert annunciator in a steady AMBER colour.  The FMC alert is delayed a few seconds.

If the toggle is pushed toward TEST 2, it will illuminate the autopilot and autothrottle annunciator in a steady RED colour and the FMC alert annunciator will illuminate steady AMBER.  The FMC alert is delayed a few seconds (see last photograph this page).

4:  FMC Alert Light

The FMC P/RST will illuminate steady AMBER when an alerting message exists on the CDU, the fail light on the CDU is illuminated, or the test switch is in position 1 or 2.  To extinguish the annunciation the flight crew can either clear the message from the CDU scratchpad or push the FMC annunciator.

FCOM - Simple yet Confusing

The above information has been interpreted from official documentation from Boeing and whilst straightforward to understand, can appear confusing because of to the repetitious nature of the information and the similar functionality of the unit.

The AFDS is powered by 28 Volts and when illuminated the legends are exceptionally bright and very sharp

Simply put, The AFDS is a caution and advisory panel that illuminates when there is a change from normal flight operations in the autopilot system.  For example, if VNAV disconnects for whatever reason, the A/P annunciator will illuminate (flashing AMBER) to caution the flight crew that something has disengaged in the autopilot system, in this case VNAV.

Anatomy of the AFDS Unit

The AFDS is a solid piece of engineering that contains it's own logic.  The unit has three buttons (annunciators) that illuminate when specific conditions are met.  Each button can be depressed to either cancel/extinguish a caution.  Interestingly, the buttons on the AFDS are angled downwards and are depressed in this direction - the push to cancel is not a direct push as you would expect with normal style korry (see first photograph).

oem AFDS button partially removed showing location of four bullet-style 28 Volt bulbs.  The button when removed from the lightplate hangs by a plastic ball which allows the button to be rotated in either direction

Each annunciator is fitted with four 28 Volt bulbs and depending upon the ‘caution’ either illuminate an amber of red coloured lens plate in a steady or flashing state.  

Removing the button to replace a bulb or troubleshoot highlights the advanced yet simplistic engineering.  A small insert is located on each side of the button and inserting a flat device such as a blade screwdriver or blunt pen knife bland into the insert allows the button to be slowly loosened. 

The complete button when carefully pulled from the unit will hang vertically from a plastic bracket that has been designed with a ball which allows the korry to be turned 360 degrees for bulb access.

Interfacing and Configuration

A Phidget 0/16/16 card is used to interface the unit with the avionics software.   Phidgets Manager 21 (free from Phidgets) is required to interface between the flight avionics suite and the actual analogue inputs from the unit.  

The AFDS annunciators are powered by 28 Volts and like the annunciators on the Master Caution System (six packs) there are exceptionally bright to ensure a flight crew notices them when they are illuminated.  
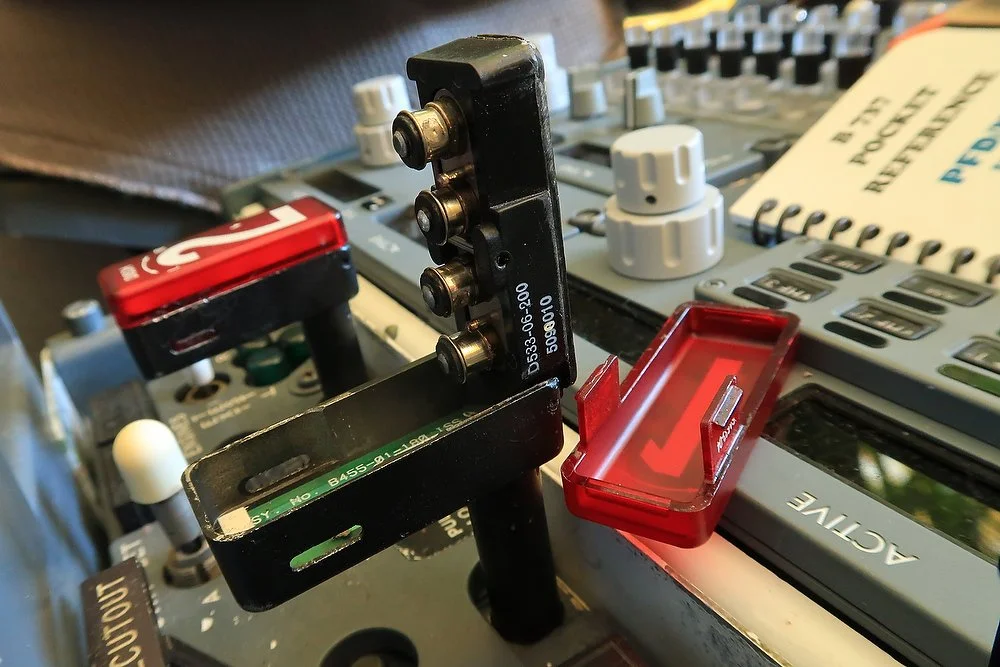
The AFDS, as with many OEM parts, is fitted with two Canon plugs on the rear of the unit (left image).  These plugs make connecting the unit to the Phidget card very easy – provided you know the plug pin outs.  The benefit of using the default Canon plugs are seven-fold: the connection is very good, they are the plug designed for the unit, they look neat and lastly, the plugs are easy to separate if you need to remove the unit for whatever reason.

I am not going to explain how to determine the pin outs.  This information has been documented several times in earlier posts.  For a detailed review see this link - How To Determine Connectivity.

Another post of interest is Using Interface Cards & Canon Plugs to Convert OEM 737 Parts.

Configuration in ProSim737

It is a two-step process to configure the AFDS unit.  First, the Phidget Manager 21 software must be opened to check the 0/16/16 card designation number and to determine the digital output numbers for the three AFDS switches.  To find the outputs, press any of the switches on the AFDS and note the output number.

Next, open the configuration menu in ProSim737.  You need to configure both switches and indicators (lights).  Find the specific switch in the switches menu and push one of the three switches on the AFDS and assign this to the Phidget 0/16/16 card in the drop down menu.  The output for the switch can be seen at the top of the configuration screen.  ProSim737 also has a very easy to use auto find option.  Press the AFDS switch followed by F and the software automatically assigns this switch to the correct

Interface Card and Outputs

Then in indicators, use the same card designation used in switches and assign the digital output (found in the Phidget Manager 21 software).  ProSim737 has an automated method for determining the lights/indicators.  Open the configuration menu and selecting the letter F opposite the function required.  The software will then do a sweep of all lights and functions determining the appropriate setting.

Whilst this sounds confusing, it’s very straightforward and comparatively easy to accomplish.

Matching OEM AFDS units.  The marks on the glass are scuff marks only and were subsequently cleaned

Although the hole for the AFDS can be enlarged with the MIP plate in-situ, any filing will result in a fair amount of waste filings.  The AFDS MIP plate should be removed to facilitate easier cutting and enlargement of the hole (if necessary)

Installation to MIP

It’s not difficult to mount the unit to the Main Instrument Panel (MIP) as there is already a gap in the MIP where the reproduction unit was fitted.  Depending upon which MIP type you are using, the hole may have to be enlarged with a dremel or a number 2 ‘bastard’ metal file before being finely finished using to remove any sharp edges.

The size of the hole should allow the AFDS unit to be firmly placed in the MIP so that the switches and buttons can be firmly pressed without the unit being dislodged. 

The difference in the length of the unit compared with a reproduction unit is obvious, which is why a secure method of attachment is paramount.  There are several methods in which to secure the unit; the best method to use is the original attachment bracket (seen in the first image).  If the bracket is missing, a solid sealant works well.

AFDS Bracket and Screws

The bracket is a specialist bracket designed to hold the AFDS unit securely to the MIP.  Once the unit is fitted to the MIP, the bracket is slid over the AFDS unit until snug with the rear of the MIP.  The four screws are then placed through the MIP from the front and tightened against the bracket.  This ensures that the unit will not dislodge.  Note that the screws are of two sizes. 

There is strong possibility that the MIP used will not feature the four holes to secure an OEM AFDS unit to the bracket and MIP.  These holes must be drilled into the MIP.  This task requires a solid eye as if the screw holes are not aligned correctly with the bracket, the unit will not fit correctly.

The AFDS units in these images lack the scews as the bracket has yet to be fitted.

OEM Verses Reproduction

First off, most the reproduction units are very good.  There is not a lot to the ADFS unit - basically three push annunciators and a two-way toggle.  The main difference between OEM and reproduction units is:

  • Brightness of annunciations and spread of light – 28 Volt bulbs verses the lower brightness and light spread of LEDS;

  • annunciator legends are laser engraved and are easy to read;

  • feel of the actual annunciators and toggle;

  • the outside appearance of the unit; being OEM, the unit cannot look any better than what it does…;

  • power Consumption and Heat Generation; and, the

  • the four screws on the front of the MIP which secure the bracket to the MIP.  These are rarely replicated correctly on reproduction AFDS units or MIPs.

oem AFDS with three annunciators illuminated during daylight by pressing test 2.  The 28 Volts provides ample power to allow the lights to be seen easily during daylight flying.  Note that the four screws are not visible in the photograph as the the bracket still needs to be fitted. 

As with most OEM parts the AFDS units are not brand new but exhibit the usual expected service wear.  This second-hand look may not 'appeal' to everyone.

Power Consumptions (bulbs and LEDS)

It is often said that a benefit of using LEDS is the saving of power and generation of less heat.  Whilst this is definitely true for items that are permanently on and illuminated, such as backlighting, many Korrys only illuminate when a specific event triggers them, and then they are only lit up for a very short period of time.  Therefore; the amount of heat and subsequent power draw is negligible.

Another point in question is the use of bulbs and LEDS in the same airframe.  Whilst it is true that LEDS are replacing bulbs in more modern airframes, it is not unrealistic to have a B737-800 with a collection of bulbs and LEDS.  As modules are replaced with newer units, LED technology will slowly creep into the older style flight decks.  

If you are having difficulty coming to grips with using either bulbs or LEDS be assured that both are realistic.

Acronyms and Glossary

The meaning of the below acronyms are second nature to many of you; however, bear in mind that everyone has to begin somewhere and some readers may not yet understand what each acronym stands for.

  • AFDS - Autopilot Flight Director System

  • AFS - Automatic Flight System

  • ALT ACQ – Altitude Acquisition

  • A/P - Autopilot

  • A/T - Autothrottle

  • CDU – Control Display Unit (used in this website interchangeably with FMC)

  • CMD - Command A or B engagae button on MCP (autopilot activation)

  • CWS – Control Wheel Steering

  • FMC - Flight Management Computer (used interchangeably in this website with CDU)

  • Korry – See Annunciator.  A brand of annunciator used in the Boeing 737 airframe

  • Legend – the engraved light plate on the front of a Korry (for example, FMC P/RST)

  • OEM – original Aircraft Manufacture (real aviation part)

  • Phidget Manager 21 – Software downloadable from Phidgets website that allows card to be interfaced between OEM part and avionics suite

  • RA – Radio Altitude

Using Interface Cards and Canon Plugs To Convert OEM B737 Parts

an example of oem wiring and a canon plug

There is little argument that real aircraft parts add a level of realism and immersion to the flight simulator experience.  Furthermore, real parts (Original Equipment Manufacture/OEM) are built to last and if converted correctly will provide many years of trouble-free operation and enjoyment.

For the uninitiated, conversion of OEM parts can appear problematic.  Where does one begin to convert an aircraft part for simulator use?  

This post will attempt to explain the basics behind converting and connecting an OEM module via an interface card and Canon plug to Flight Simulator using ProSim737.   Additionally, it will introduce and provide a general overview of Phidget Manager 21 (PM-21) software.

Please note, I am not an expert on electronics.  My background is Earth Science (geology) which is far removed from electronics...  Like others, I have learnt how things are done by 'trial and error' and listening to those more knowledgeable than myself in this field.

OEM Parts - Modules and Panels

The first thing you will notice about an OEM part (module/panel) is the build, feel and appearance is much better than a reproduction part.  It is at this stage you will be thinking ‘I don’t really want to destroy the part by opening it and rewiring everything’.  The good news is that, while some parts certainly do need rewiring, many do not.

Fortunately, the process to convert many OEM components is similar.  Granted the pin-outs and wiring are different between units, but the methodology used to determine the pin-outs is identical.  It’s a matter of replicating your methodology with each part.

Canon Plugs - The Interface to a Wiring Maze

If you look inside a OEM panel you will be surprised at the multitude of multicolored wires that connect to various relays, switches, solenoids and circuitry. Moreover you will be very impressed with the neatness and integrity of the wiring harness and as mentioned earlier, you will be loath to destroy the craftsmanship employed.

Twin Canon plugs belonging to a OEM 737 AFDS. The plug on the right is OEM while the left is bespoke

In the real aircraft, a module is connected to the aircraft’s wiring harness by a Canon plug which is a plug with any number of pins; each pin corresponding to particular function.  A Canon plug can be locked in place with the clockwise turn of the locking cap providing a solid yet removeable connection.

The benefit of Canon plugs, amongst others, is that they provide an easy and solid connection to the module’s internal wiring.    Many individuals remove these plugs, pull apart the module and gut the wiring starting afresh.  While this certainly is possible, why do it when all that is required is to ascertain the pin-outs of the Canon plug to connect to the wiring inside the module.  I doubt many of us, with the exception of a professional electrical craftsman, have the ability to duplicate the quality of workmanship seen in an OEM module.

Unfortunately, it is common place to find modules that are sold without the corresponding male or female side of the plug.  In this case the correct male or female plug must be bought separately, an existing plug converted, or a new plug fabricated.  If you have the opportunity to use a Canon plug, always try to use it before cutting the plug from the unit.  

Determining Pin outs - The Value of a Good Multimeter

The crux of converting an OEM module is to understand the functionality of the module in question.  The best place to begin learning how a module operates is the latest FCOM.  OEM modules are made for real aircraft and as such often have functions that may not be incorporated into flight simulator.  After arming yourself with 'operator knowledge', the next step is to decipher the often cryptic maze of pins in the Canon plug.  Once this is understood, the conversion is relatively straightforward with the addition of an interface card and power supply (if needed).

oem Canon plugs showing the snake-like pattern of pin location and numbering.  This module uses two Canon plugs marked J1 and J2

The pins of a Canon plug will provide at the minimum: functionality for the part, an earth (common) and a pin (s) dedicated to power.  Traditionally, all modules have used incandescent bulbs for backlighting which is powered by 5 Volts.  Depending upon functionality, some modules require different voltages with 28 Volts being the norm.

It’s important to be able to decipher which pin does what to ensure correct functionality within Flight Simulator.  This involves logical thinking and little bit of trial and error.  It is a high probability that not all the pins in the Canon plug will be used or needed in Flight Simulator.  Remember, that in a real aircraft there are multiple systems and some wires and pins will connect with these 'unneeded' systems.  

If you carefully study the pin layout in a Canon plug you will note it is not random – there is a definite order in how the pins are presented.  You will note that in all probability some pins are numbered, but not all.  The numbers move sequentially so the pin beside the pin marked ‘5’ will either be pin ‘4’or pin ‘3’.  The snake-like pattern printed on the inside of the plug is there for good reason - it acts as map guiding you from the highest number to the lowest.

By far the easiest way to determine pin-outs for functionality and power, if you do not have a wiring schematic, is to use a multimeter set to continuity mode (beep mode). 

Phidget card 0/16/16 (one of several types).  Phidgets are a proven way to convert many OEM components; the 0/0/4, 0/16/16, 1066 analogue and servo cards are mainstays.

Which Interface Card

Most parts require an interface card of some type to allow communication between the part and flight simulator.  There are several cards that, depending upon the part’s functionality, can be used: Leo Bodnar joystick cards and PoKeys cards are commonly used while Phidget cards have been the mainstay for quite a few years.  Flight Deck Solutions also produce some excellent system cards while Polulu is another manufacturer.

Which interface card is used will depend on the functionality of the module.  A simple on/off switch or a rotary knob can be interfaced using a PoKeys, Leo Bodnar Joystick or another similar 'button-type' card.  If you have a lever that needs calibration then a potentiometer will be needed.  The Leo Bodnar card is an excellent choice and will automatically register the potentiometer’s movement as an axis when the card is activated in Windows.  A light indication (korry), or a more complicated module may require a card such as Phidget 0/16/16 or 0/0/4 card.  Throttle automation and motor activation will need additional cards such as a Phidget Advanced Servo card or Polulu card.

Phidget Cards

Phidget cards, or Phidgets, have been around for a considerable time and have been the mainstay for enthusiasts wishing to control robots, cars, airplanes and the like.  Phidgets produce several cards; however, the core cards used in flight simulation are the Phidget advanced servo cards, 0/16/16, 0/0/8 and 0/0/4 cards.  To read more about Phidget cards, navigate to the the Phidget website and enter the card type into the search bar.

What Does the Interface Card Do?

The interface card is placed between the computer and the OEM module and the wires from the Canon plug are fed directly to the card (power wires usually do not connect with the card).  The card provides you with three things: an input, an output and a USB connection to the computer (or a powered hub that is then connected to the computer). Once connected, the card acts as an interface which converts an inbound analogue signal (For example, the upwards or downwards ‘throw’ of a switch) to an outgoing digital signal. For every analogue input there will be a corresponding digital output. 

An interface card requires software/logic which either comes with the card (embedded) or is downloaded from the developer’s website.  Some cards utilize Windows and the process of plugging the card into the computer will initialize the card allowing the embedded software of the card to be viewed from in Windows.  The software is found by opening the  joystick controllers menu - type ‘joy’ into the search tab of the computer to be directed to this joystick wizard. 

An example of a card that has embedded software and comes pre-calibrated is the Leo Bodnar Joystick card.  The 'Leo' card uses the joystick controller menu in Windows to allow access to the card logic. Other cards such as Polulu require calibration and programming in their own software and without calibration and programming will appear unresponsive when first connected to a computer.  Phidget cards utilize their own software (Phidget Manager 21) downloadable from the Phidgets website.

If using multiple cards of the same make and type, each card will be assigned a dedicated number allowing you to know which card controls what module.

To connect a function (for example a switch) to the Interface card you run the wire from the Canon plug/terminal to the input terminal on the card.  This process is replicated for each function of the module, bearing in mind that some functions on the Captain and First Officer side may be duplicated.  If this is the case, the wires from the module are connected into the same input terminal on the card. 

If power is required to operate the module's function or for backlighting of the panel, then a wire from the power supply will need to be connected to the correct pin in the Canon plug of the OEM module.  The usual method is to connect  power from the power supply to a solid high amperage terminal block and then to the OEM module.  Power is not normally connected directly to an interface card, unless the card has this particular capability. 

The connection of the wires to the card and connection of the card to the computer provides the link to enable the various inputs and outputs to be read either by standalone software, Windows, or directly in ProSim737.

Phidget Manager 21 User Interface.  Each serial number is specific to an individual card that is allocated when configuring the output in ProSim737

Phidget Manager 21 (PM-21) - The Bare-shell Basics

PM-21 is the replacement for the older styled Phidget’s Library.

Phidget Manager 21 (PM-21) software when installed to your computer generates a list indicating which Phidget cards are currently connected to the computer.  Each connected Phidget card can be opened individually from this list. Selecting a card will open a sub-window providing set-up information and the inputs and outputs for the selected Phidget card. 

There is also a testing area to check the functionality (inputs & outputs) of the module in addition to several other specialist features.

It is a little difficult to explain, but when this screen is open you can as in the above example, manipulate the switch up or downwards and a corresponding tick (check mark) will be seen in the input.  PM-21 will then assign this item (switch) to a dedicated output number specific only to this card.  The output number is what is used when configuring the device in ProSim737.

If converting an indicator (light) or mechanically-produced sound, the software can be used to determine if the indicator has been wired correctly.  Selecting the input section and placing a tick (check) into the appropriate box will cause the indicator to illuminate or the sound to become audible.

PM-21 UI for Phidget 0/16/16 card that controls fire suppression panel.  Moving a switch on the hardware will show a corresponding tick in the input section.  The output section can be used to test the hardware to ensure the function is working correctly

It is important to remember that the  Phidgets 21 Manager can only read installed cards if ProSim737 is closed (as of ProSim737 Version 1:34).  If the ProSim737 main menu is open, PM-21 cannot obtain the necessary information to read the card correctly.

Configuring the Interface Card in ProSim737

Once the wires from the module have been connected to the inputs of the interface card and inspected (in PM-21, Windows, or whatever software) for correct connection, the output from the interface card must be configured in ProSim737.

Before proceeding further, it is important to determine if the cards you are using are being read by ProSim737.  Open the main ProSim737 menu and select configuration/drivers and confirm that each box corresponding to the card type installed has been checked/ticked.  After this has been verified, the main ProSim737 screen will indicate which cards ProSim737 is reading.  This is a handy way to know if your interface cards are connecting correctly to your computer and are being correctly read by ProSim737.

The process to configure an output is addressed in the ProSim737 manual.  Therefore, the following is an overview.

To configure an output:

  1. Select the appropriate tab in the configuration menu (configuration/switches, configuration/indicators, etc.) that corresponds to the function of the module (i.e. light test switch)  

  2. Scroll down through the list to find the correct function (i.e. light test switch)

  3.  Move the switch on the module noting the input/output variables at the top of the computer screen

  4. From the drop down box beside the function, select the correct interface card type and serial number. (Another method is to press A located beside the function.  This will automatically select the last known position of the switch and automatically assign it).

  5. Beside the interface card drop down menu, there is another drop down menu.  Select this menu and select the correct digital output (variable shown on the screen when the switch was moved)

A similar method can be used for indicators.

Once this is done, close and reopen the ProSim737 main menu.  The function should now be registered in ProSim737. Although this process sounds rather convoluted, once done a few times it becomes second nature.

Conclusion

This is a very simple introduction to the conversion of OEM parts using the Canon plug system and the use of interface cards, in particular Phidget cards and the use of Phidget Manager 21 software. 

In general, PoKeys, Leo Bodnar joystick cards and Phidget cards (type 0/16/16 and 0/0/4) will cover the interfacing of many functions used in real aircraft modules.  However, not every part is as easy as a switch to convert.  Depending upon the complexity of the module, there may be multiple pin outs that need to be deciphered, additional logic needed, and the requirement to use multiple or single interface and/or relay cards before the part will successfully connect with Flight Simulator.

Acronyms and Glossary

  • Canon Plug – A plug made by Canon that allows a secure link between wiring systems.  The plug incorporates any number of pins, each pin corresponding to a particular functionality.  Many Boeing modules incorporate one, two, three or four Canon plugs depending upon the degree of sophistication in the module.

  • Module or Panel – Boeing parts are often called modules or panels (I use both words interchangeably)

  • OEM – Original Aircraft Manufacture (real aviation part).

  • Phidget Manager 21 (PM-21) – Software supplied by Phidgets that provides the logic behind the various Phidget interface cards.

OEM Boeing 737 Stick Shaker - Interfacing and Operation

OEM 737 stick shaker installed to Captain-side column.  The lower section of device is what vibrates

The stick shaker is standard on all Boeing series aircraft; the Next Generation having two units (Captain and First Officer) and the earlier classic series having one unit.  The stick shaker is mounted directly to the control column and is designed to vibrate if air speed degrades to stall speed.  The Stick shaker I am using is manufactured by a company in New York. It is powered by 28 Volts (27.5 Volts to be exact).  

Configuration

Configuration of the stick shaker is a relatively easy task.  The electrical cable from the device is connected to 28 Volts, or if this is not available 12 Volts;  12 Volts still produces enough power for the shaker to vibrate, although the intensity is not as great as if the unit was connected to 28 Volts. 

To allow Flight Simulator to connect to the stick shaker, a relay card is required such as a Phidget 0/4/4 relay card.  A USB cable then connects from the card to the computer.  The stick shaker will vibrate when variables that relate to low air speed are met.  The variables are determined by the flight avionics software (ProSim737 or Sim Avionics).

Phidget 0/0/4 relay card showing the main positive wire (red wire) cut with each end inserted into the correct terminals of the relay card

Interfacing and Wiring

The Phidget 0/0/4 relay card is mounted in-line between the 28 Volt power supply and the stick shaker.    Either of the two wires (+-) from the power supply can be cut to install the in-line relay; however, only one wire is cut; the other remaining unbroken from the power supply to the stick shaker.

The 0/0/4 relay card has four relays of which one is required.  Each relay has three terminals: normally open (NO), common (C) and normally closed (NC).  For the stick shaker the common and normally open terminals are used.

Carefully cut one of the two wires leading from the 28 Volt power supply.  Insert the wire coming directly from the power supply into the terminal marked common (1C, 2C, 3C or 4C).  The other end of the cut wire, which comes from the stick shaker is inserted into the terminal marked NO (normally open) of the same terminal.

If the wires have been inserted into the correct terminal of the relay card, the circuit will be complete only when the parameters established within the flight avionics software are valid.  At all other times the relay will break the circuit by not allowing the power to reach the stick shaker. If you have made a mistake, the stick shaker will vibrate continuously.

Protection

When connecting the stick shaker, it is a good idea to include a diode to protect your computer from any magnetic return signal should the relay fail.  A return signal to the computer may cause problems with the computer, and in it worse instance allow 28 volts to surge into the computer destroying your mother board. 

Positive and negative wires from the stick shaker enter the terminal block on the right.  A diode is placed on the corresponding end of the terminal block prior to the two wires running to the relay (not shown)

A high-end relay, such as a Phidget 0/0/4 relay should not fail, and if it does it should fail in the closed position.  However, if 'Murphy' or 'Sod' is your First Officer then it is better to be safe than sorry, so best install a diode.

A diode is an inexpensive and very simple device that behaves in a similar way to a black hole (astronomy).  In a black hole all matter is sucked into the hole and no matter, including light leaves the hole; it is one way trap.  A diode behaves in exactly the same way.  If a failure of the relay occurs, any power that is being transmitted through the wire from the stick shaker (28 volts) will enter the diode and be trapped.  No current will leave the diode.

Three 6 cm diodes.  The silver spirals indicate the positive side (red tape) while the opposite end is the negative (white tape).  Diodes come in an array of differing shapes, sizes and trapping capacities

The heavy duty diode should be placed in parallel between the stick shaker and the relay card.  It is best to try and place the diode as close to the stick shaker as possible.  Place the positive side of the diode (usually appropriately marked) on the positive side.  The other end of the diode place on the negative side.  If you use a terminal block it is very easy to connect a diode into the circuit (see photograph).

Incorrect Wiring

Do not become concerned if you have connected the wire to the wrong terminal - the stick shaker will not be destroyed.  It will be obvious if you have inserted the wires incorrectly, as the stick shaker will operate continuously as it has unbroken power.

I was debating to re-paint the stick shaker, however, decided to keep it as it is.  I like the used look rather than the pristine 'never been there' look.

Although the stick shaker is not essential, it’s often the smaller things and attention to detail which help bring the simulator to the next level.  I am using OEM control columns and adding a stick shaker enhances the immersion.

OEM and Reproduction

When an OEM stick shaker vibrates, especially when you are not expecting it, the vibrations startle you . The yoke vibrates and the noise of the vibrations is quite loud. In contrast, reproduction stick shakers generate lower vibrations and noise.

Acronyms 

  • OEM - Original Equipment Manufacture (real aviation parts)

BELOW:  A short video demonstrating the noise and vibration made to the control column and yoke by the stick shaker when approaching stall speed.


V1-Avionics, ARINC 429 Protocol & SIM429-11 Interface - Interfacing OEM Aviation Parts

There’s nothing like using a genuine aviation part in Flight Simulator.  Real parts are made to last, cannot be upgraded, and offer a level of immersion rarely attributable to a reproduction part.  There is also the historical perspective knowing what airframe the part was removed from.  This said, although OEM parts are not difficult to find, a solid level of ability is needed to successfully convert many parts to use in Flight simulator.  

Conversion of an OEM part can involve  re-wiring, determining the pin-outs for each function of the part, interfacing with an appropriate card such as a PoKeys or Phidget card and connecting to a suitable power supply.  OEM parts that are more complicated in nature may involve further work to determine functionality and necessitate several interface cards and relays for correct operation.

ARINC 429 Protocol & SIM429-11 Interface

Put very simply, ARINC 429 is a data communication protocol used on most higher-end commercial, military and transport aircraft.  The protocol defines the physical and electrical interfaces to support an aircraft’s avionics instruments.  

With knowledge of the protocol, many instruments can be converted for flight simulator use if an appropriate avionics interface is used between the simulator and the OEM part.

 V1 Avionics has developed a low-cost interface called the SIM429-11 Interface.  This interface will allow easy connection of OEM instruments avoiding the necessity of rewiring and conversion.

Whilst the Protocol is used by many OEM parts, it is not used by all; therefore, if the Protocol is not supported, conversion of that part to Flight Simulator will still be the traditional way using an interface card.

V1-Avionics

V1-Avionics is the company behind the development of the SIM429-11.  The project team comes from a background in telecommunications, engineering and aerospace applications and is ideally positioned to unravel the intricacies of the ARINC 429 Protocol, to develop, and eventually release the SIM429-11 interface for public use.

LEFT:  SIM 429 enclosure by V1-Avionics - compact and easy to install (image copyright V1 Avionics).

Once the interface is released, conversion of OEM avionics instruments will become easier, more streamline, and within the reach of all flight simulator enthusiasts.

I'll post additional information as this technology unfolds.

Acronyms 

OEM - Original Equipment Manufacture (real aviation parts)

Boeing 737 NG Master Caution System ('six packs') Installed and Operational

There is no mistaking the clarity and brightness of an OEM unit.  This is the Captain-side Master Caution System (MCS)

In my opinion, many simulators fall short when it comes to replicating the Master Caution System (MCS).  Most companies offerings are cheesy-looking in appearance, exhibit the incorrect colour hue, and lack the brightness seen is the OEM unit.  

This post will examine the use of Master Caution System and explain how the OEM items were fitted to the simulator and interfaced with ProSim737 avionics suite.  It will also briefly compare the real unit to the reproduction unit.

Click images for larger view.

Boeing Master Caution System (MCS) - Overview and Use

The Master Caution System (MCS) was developed for the Boeing 737 to ease pilot workload as it was the first Boeing airliner to be produced without a flight engineer. In simple terms the system has been designed to be an attention getter - the brightly illuminated version of a flight engineer’s 'barked' out commands…

The MCS comprises four annunciators (warning buttons) and two System Annunciator Panels (six packs) located on the Main Instrument Panel (MIP) in the glareshield on both the Captain and First Officer sides.  

The location of the annunciators and the intensity of illumination is important.  If an annunciator should illuminate, the positioning and brightness is such, that there is minimal possibility of a flight crew ignoring the warning.  Whilst the warning buttons are duplicated on both sides of the MIP, the annunciation panels provide different 'cautions' for the Captain and First Officer.  

Fire Warning and Master Caution annunciators showing The detailed engraving on the legends

Fire Warning (Fire Warn) Annunciator

If a fire is detected in the APU, main gear well, cargo compartment or during a fire warning (or system test) in either engine, the Master Fire Warning annunciator (button) will illuminate RED.  The fire bell, and if on the ground the remote APU fire warning horn will also activate.  

Depressing the button from either the Captain or First Officer's side with a firm push will extinguish the button’s light and silence the audible fire bell and APU warning horn, in addition to resetting the system for additional warnings.  Pushing the fire warning bell cut-out switch on the overheat/fire protection panel (fire suppression module or fire handles) accomplishes the same action.

Master Caution Annunciator

The Master Caution annunciator (button) is coloured AMBER.  The button will illuminate when a system annunciator (six pack) has been triggered indicating a fault has been detected within the aircraft systems.

Depressing the button with a solid push (Captain or First Officer side) will extinguish the button’s light and reset the system for additional master caution conditions.

System Annunciator Panel ('six packs')

There are two System Annunciator Panels, one on the Captain side and one on the First Officer side.  Each light plate has six different AMBER coloured 'cautions' which are arranged such that the 'cautions' are in the same orientation as the overhead panel.  For example, FUEL is bottom left.  

Components of the Master Caution System:  Two duplicated Fire Warning and Master Caution buttons and the two System Annunciator Panels (six packs).  The diagram shows the various cautions that a flight crew can expect to observe (image copyright FCOM).  The MCS is identical for all Boeing series airframes 600 through 900 including the Boeing Business Jet (BBJ)

The display annunciations relate a specific aircraft system.  The following are displayed on the Captain-side panel: FLT CONT, IRS, FUEL, ELEC, APU and OVHT/DET.  The displays for the First officer side panel are: ANTI-ICE, HYD, DOORS, WNG, OVERHEAD and AIR COND.

If a master caution condition exists, the Master Caution light will illuminate AMBER along with the appropriate system annunciator.  Likewise, if a caution exists and is displayed on either six pack the Master Caution button will illuminate.

To extinguish the System Annunciator display, the Master Caution button should be firmly depressed.

Self-Test and Recall

The System Annunciators have a self-test and recall function.  Firmly pressing and holding either light plate will cause all annunciation lights to display (self-test).   To recall the last displayed 'caution', the light plate is pressed once and released.  After release the system annunciator will display whatever "caution" was last detected.

There is little argument that the OEM Master Caution System exceeds the quality of reproduction units.  This is the MCS from a top shelf manufacturer.  Compare thsi with the OEM counterpart. Reproduction units could be easily improved if they used a number of high intensity LEDS aligned in an array so that the light had better coverage

Reproduction Verses OEM

Broadly speaking, there is a large gap in quality between reproduction MCS units and the OEM version.  

For the most part, reproduction annunciators are very easy to depress - a tap of a finger will deactivate a warning or recall a ‘caution’.  The legend is printed rather than lazer engraved and the colour of the light is often an incorrect colour hue which lacks the brightness of the real unit.  The last point is caused by low voltage LEDs which are not bright enough and do not have an adequate throw of light to illuminate all of the legend.  Furthermore, reproduction units are for the most part made from plastic, rather than longer lasting aluminium.

This said, some highly priced units do replicate the OEM part very well but they do cost upwards of $450.00 USD (see Fly Engravity).

In contrast, the OEM unit has engraved legends that are very distinct and easy to read, require a firm press to engage, and are very bright.  OEM units use 28 Volt bulbs which burn very brightly.

Not Just A Finger Tap - Firmness in Operation

An OEM annunciator requires a bit more force to depress the button in comparison to a reproduction unit.  I'm uncertain if this is due to the strength or weakness of the internal spring mechanism or as I've been lead to believe, is a built-in safety feature; thereby minimising the chance of a flight crew accidentally depressing and cancelling an annunciator ‘caution or warning’ with a light tap or brush of the of the finger or hand.

Classics Verses Next Generation (NG)

Both airframes incorporate the Master Caution System; however, the classics use different display cautions for the system annunciators. I believe there are five 'cautions' on the classic in contrast to six on the NG (600, 700, 800 & 900).  The fire and master caution annunciators are identical on all Boeing airframes.

Interfacing and Power Requirements

To interface the unit requires a Phidget 0/16/16 interface card while the power to illuminate the bulbs is from a 28 Volt power supply.  A 0/16/16 card provides 16 inputs and 16 outputs which allows complete coverage of all functions remembering some functions duplicated on the Captain and First Officer-side have wires placed into the same input terminal. The duplicated items are the fire and master caution annunciations.

Each of the four annunciators has three terminals.  A multimeter set to conductivity or beep mode is used to determine which terminal connects to which button press. 

  • To learn how to use a multimeter, read this article.

The System Annunciator Panel (six pack) is a little more convoluted as it has a recall facility and has different cautions between the Captain and First Officer units.  However, with a little diligence it’s possible to work out the terminal and wiring sequence.

Anatomy of a System Annunciator (akasix pack)

Each unit is made up of three parts:  the actual annunciator, the light plate (which incorporates the legend), and a rectangular housing that I call the cigarette packet. The housing is attached to the annunciator by two hex screws.

Light plate removed from housing and rear terminals.  Note individual pins for specific display cautions and "clam shells" for connection

The light plate has a number of pins that connect with the annunciator base, and on the rear there are eight terminals (lower image) each connecting with a specific terminal.

If you remove the outer casing, a circuit diagram has been stenciled to the unit.  It’s trial and error using this diagram to determine the correct pin outs for the terminals, but once known it’s only a matter of connecting the various wires from the the terminals to the 0/16/16 card.

Eight terminals.  The outer edge of the hex nut can easily be observed on the upper left side of the annunciator

It’s important to note that if removing or loosening the outer cigarette-style housing, a hex screw located at the corner edge of the unit will need to be loosened. 

Phidgets 21 Manager

The Phidget 21 Manager is provided by Phidget and can be downloaded from their website.  This software will, when a Phidget card is connected, register that card and its distinctive number. 

Opening the Manager and then selecting the card number ID tag will allow you to see what inputs and outputs you have wired and assigned to whatever item you have connected.  You will also be able to easily test any output.

Configuring in ProSim737

Once the pin outs have been correctly determined, configuring in ProSim737 is very easy.  Open the configuration tab and select the indicators menu (tab).  Next find the appropriate names (DOORS, ELEC, APU, ANTI-ICE, etc) and in the drop down box assign the correct Phidget card and output number.

Installing to the Glareshield

Main Instrument Panels (MIPS) manufactured by different companies are rarely identical; each MIP has subtle differences – some are easier to install OEM items to than others.

Detail of Master Fire Warning annunciator showing manufacturer name and threaded button with hexagonal attachment nut.  different manufacturers produce slightly different shaped bodies

Reproduction annunciators are usually secured to the glareshield by screws; however, OEM parts often require retrofitting to allow the item to be fitted correctly. 

In the case of the FDS MIP, a backing plate made from ABS plastic was crafted to fit into the gap where the fire warning and master caution buttons reside; the plate was secured to the glareshield by self-tapping screws.

Two holes were then carefully drilled at the correct distance to allow the circular shaft of each button to be fitted through the plastic.  Once the button was sitting proud in the correct position, the screw and nut assembly was tightened against the backing plate.  

The annunciators are not designed to sit neatly side by side in the glareshield; they can be twirled to any orientation; therefore, it’s not necessary to be perfect in the alignment of the drill hole – just very close!

Securing the system annunciators to the MIP was slightly more problematic and involved using a spacer between the outside of the housing and the gap in the glareshield.  The spacer expands as you push the six pack into position, and it’s a matter of enlarging the spacer to secure the unit in the correct position.  This said, the method used is not optimal and a more secure method needs to be developed.

Video (Captain-side only)

A short video demonstrates the brightness of the buttons and display cautions.

The annunciator light plate displayed in the video is not in the best condition; it is common for airlines to place clear tape over the legends to protect them.  This did not concern me at the time, as six packs are scarce to find.  However, I have since found four buttons in better condition and will soon exchange them.

  • For those interested, to silence the fire bell in the video, I used the bell cut-out switch on the fire suppression module rather than depressing the Fire Warning Annunciator, which would have accomplished the same task.


737 Master Caution System and six packs

Acronyms and Glossary

  • Annunciator – A single coloured light or group of lights used as a central indicator of status of equipment or systems in an aircraft. Usually, the annunciator panel includes a main warning lamp or audible signal to draw the attention of operating personnel to the annunciator panel for abnormal events or conditions.  To annunciate means to display or to become audible.  Annunciators often are called KORRYS (KORRY is the name of a manufacturer).

  • Cautions – Annunciations from the System Annunciation Panel in amber colour.  For example, DOORS, APU and ELEC.  An annunciation 'caution' triggers the Master Caution Warning light.

  • FDS – Flight Deck Solutions

  • Light Plate - the actual forward portion of the annunciator separated from the rear section and the housing.

  • Legend – The portion of the light plate that includes the engraved display (for example, ELEC or DOORS)

  • MCS – Master Caution System incorporating: Fire Warning, Master Caution Warning and two annunciator panels (six packs)

  • MIP – Main Instrument Panel

  • OEM – Original Equipment Manufacture (real Boeing part)

  • Phidget 21 Manager – Configuration software to use a Phidget card

  • 'Six Pack' – Nickname for System Annunciator Panel

  • System Annunciator Panel (SAP) – Light plate with six 'cautions' and recall facility (NG only).  Also known as 'six pack'

Update

UPDATE ON 2015-07-29 13:10 by FLAPS 2 APPROACH

Captain side straight-through cable connector mounted beneath the glare wing. The colour-coded internal wiring of the lumen can be seen.

The white terminal block facilitates connection of the the MCS with the Lights Test functionality (Lights Test toggle located on the MIP).  To the terminal block, a wire connects directly to a Lights Test Busbar located in the center pedestal.  The busbar then connects directly with the OEM lights test toggle switch. The brackets are made from ABS plastic

In June 2015, the wiring design for the simulator was changed, and the annunciators were rewired to facilitate conformity with the wiring of other OEM parts.  The Captain and First Officer annunciators were separated and wired directly to a Phidget 0/16/16 card. 

To ensure that the wiring was easily identified, wiring for the Master Caution System was color-coded to avoid any confusion with the wires that have been used to wire the AFDS units.

The new wiring design called for each MCS to be independently wired and separated from the other.  Each system has the wires budded into a dedicated, colour-coded lumen which is then connected to a serial port connector mounted to a bracket.  The bracket is attached to the underside of the glare wing at the rear of the MIP glareshield.  The connectors have straight-through cables that snake behind the MIP to mate with their respective connectors on the SMART module.

Main Instrument Panel (MIP) - Seeking Accuracy in Design

OEM 737-800 MIP AND COMPONENTS (Shawn from Airdrie, Canada, 737NG Panel (4559309701), CC BY-SA 2.0)

A reproduction Main Instrument Panel (MIP) may appear identical to its OEM counterpart, but there can be there can be subtle differences depending upon which company you purchase a MIP from. 

The disparity may not be important to individuals who decide to use a full reproduction flight deck from the same company. However, problems will soon surface if mixing parts from other companies’ or using OEM components.

The following relate to all reproduction MIPS.

The Bezel. The bezel is the frame that surrounds the display units (DUs).  In the real aircraft the bezel forms part of the display unit, which is why the bezel breaks open in the lower area; to allow access to and removal of the unit. 

If you carefully look you will note there are no screws that hold the bezel in place to the MIP.  Quite a few manufacturers use Phillip head screws in each corner of the bezel to attach the bezel to the MIP. 

In the real aircraft the bezel is made from machined aluminum.  

Landing Gear Lever.  The real aircraft has a smaller knob than the one currently used by Flight Deck Solutions. The landing gear knob in the real aircraft is translucent.  Further, when the landing gear is in the down and locked position, the red trigger located on the gear shaft completely recesses between the two half-moon protectors and the trigger.

Fuel Flow Reset Switch. The real aircraft uses a switch/toggle with a larger defined and bulbous-looking head, rather than the standard-style toggle most manufacturers use.  The OEM toggle is also very specific in operation (3 way pull & release). 

The knobs used on the MIP. These knobs are called general purpose knobs (GPK) and it's uncommon for a reproduction knob to look identical to an OEM knob.  OEM knobs present with curved rather than straight edges and have the grub screw located in a different position to most reproductions.  Many reproduction knobs have the grub screw located at the rear of the knob. 

Additionally, OEM knobs have an inside metal shroud (circular metal retainer) and a metal grub screw thread, both important to ensure operational longevity of the knob; reproduction knobs usually do not have this.  The metal shroud can be important as it increases the longevity of the knob as it stops the acrylic from being worn down over time with continual use.

The Next Generation also has a backlit, black coloured line that runs adjacent to a translucent line on the front of the knob; at night this line is backlit. Most of the replica knobs have a black line which is a transfer (sticker) that has been hand applied to the knob.  Stickers and transfers often lift and peel away, and hand application is often haphazard with some transfers straight and others being off-center.

Annunciators (Korrys). The annunciators on most reproduction MIPs use LED technology and may exhibit an incorrect colour hue in contrast to the OEM part.  Reproductions can also be lacking with regard to the legend, as OEM legends are lazer cut and the lettering is very sharp and well-defined. 

Annunciators in the real aircraft are illuminated by 28 Volt bulbs contrasting the low brightness LEDs seen in reproduction Korrys - this alone can make a huge difference in aesthetics.  Finally, the push to test function seen in the real item, to my knowledge, is lacking in reproductions. Be aware that some newer Next Generation airframes may use LEDs in favour of bulbs.

Colour.   Boeing grey (RAL 7011), has a specific RAL colour number; however, rarely is every MIP or aviation part painted exactly the same grey colour; there are sublime differences in shade, colour and hue.  Inspect any flight deck and you will observe small colour variations.  Type RAL 7011 into Google and note the varying shades for a specific RAL number. OEM and reproduction panels both share varied colour hues of RAL 7011.

Dimensions & 1:1 Ratio.  High-end MIPs for the most part are very close to the correct 1:1 ratio of the OEM item and differences, if noticeable, are marginal.  But, less expensive MIPs can have the incorrect dimensions.  It is not only the overall dimensions that are important, but the dimensions of the spaces, gaps and holes in the MIP that allow fitment of the various instruments and modules.

Whilst this may not be a concern if you are using reproduction gauges that came packaged with your MIP, it can become problematic if you decide to use OEM parts.  There is nothing worse that using a Dremel to enlarge a hole in a MIP that isn't quite the correct size.  Worse still, is if the hole in larger than it should be.

Musings - Does it Matter ?

If everything fits correctly into whatever shell you're using, then a small difference here and there is inconsequential.  However, if you are striving for 1:1, then it is essential to know what is fact and what is fiction (Disneyland). 

Important Point:

  • There are many nuisances between MIP manufactures. I have mentioned but a few in this article.

System Simulation is a Priority

As I move more into the project, I realize that many items available in the reproduction market are not identical to the real aircraft; a certain artistic license has been taken by many manufacturers.  This said, while it's commendable to have an exact reproduction of a flight deck, keep in mind that a simulator is primarily a simulation of aircraft systems.

Of course this doesn't mean you throw everything to the wind aesthetically.  To do so would mean you would have an office chair, desk and PMDG in front of you.  Aesthetics are important, as they stimulate by visual cues a level of immersion, that allows the virtual pilot to believe they are somewhere other than in their own home.

If you inspect real-world flight simulators used by aircraft companies, you will quickly note that many of the simulators do not replicate everything, or strive to have everything looking just like the real aircraft.  Simulators are designed for training and whilst a level of immersion must be apparent, replicating aircraft systems takes priority.

Acronyms & Glossary

  • Annunciator - A single coloured light or group of lights used as a central indicator of status of equipment or systems in an aircraft. Usually, the annunciator panel includes a main warning lamp or audible signal to draw the attention of operating personnel to the annunciator panel for abnormal events or conditions.  To annunciate means to display or to become audible.  Annunciators are often called Korrys; Korry is a manufacturer of annunciators.

  • FDS - Flight Deck Solutions

  • Korry – See Annunciator.  A brand of annunciator used in the Boeing 737 airframe.

  • Legend - The plastic lens plate that clips to the annunciator.  the legend is the actual engraved writing on the lense.

  • MIP - Main Instrument Panel.

  • OEM - Original Aircraft Manufacture (aka real aircraft part).

  • RAL - International colour matching system.

Ferrules

ferrules. They enable easy connection of thin wires to terminal blocks

What are ferrules some of you may ask – no they are not the undesirable neighbours that play loud music and park old cars in front of your house; they are called “feral”… 

A ferrule is a small electrical connector that comes in a variety of different sizes that is very handy when connecting electrical wires.  The metal needle of the ferrule is hollow allowing you to fit the correctly sized wire for maximum connectivity and faithful conductivity.

Solid Connection

1mm red ferrules connected to a terminal block

Building a simulator involves the connection of a multitude of wires to interface cards, power supplies, terminal blocks and other electronic components.  Having a method to easily secure wires that ensures reliability is a great asset.

Whilst you can solder wires to the above items, it is often necessary to remove a wire for testing purposes or to add an additional function to the connection.  Twisting and clamping the wire beneath the screws or under a screw tab while functional is far from tidy, and eventually the wire will become damaged with loose wire strands. 

Loose and damaged wires can translate to poor connectivity leading to frustration when something does not work correctly.

A ferrule can easily be attached to the end of a small wire (22 gauge) and crimped.  The ferrule needle can then be cut to size to fit into an interface card or terminal block.  Ferrules come in a variety of colour-coded sizes and can be used for differing wire gauges.

A special crimper tool is used to crimp' the ferrule in place securing the wire.

I’ll submit that ferrules are not suitable to use everywhere; however, for certain applications they are useful to have in your simulator-building toolkit.

Changing Pilot Automation Dependency

Cp Flight MCP

Although this website primarily discusses construction and flying techniques of the Boeing 737, I believe it's pertinent to include articles that relate to flying in general and have merit to both real-time aviators and virtual pilots.

This article supplements an article that discusses the Speed, VNAV and Altitude Intervention (INTV) system.

Rather than create a link to an interesting article which may at some stage be removed, I’ve copied the article verbatim below.  The article which came from Aviation Week Space and Technology is a little long, but well worth a read.

How To End Pilot Automation Dependency

It is foolhardy to draw hasty conclusions about accidents. The investigation into the cause of the Asiana 214 Boeing 777-200ER crash at San Francisco International Airport on July 6 is still in its early stages. While it is not clear exactly how crew performance figured into the accident that claimed three lives, we believe that there is no excuse for landing short on a calm, clear day in a fully functioning jetliner. If the NTSB determines that the 777-200ER ‘s engines and systems were working properly, then how could the Asiana pilots have gotten themselves into that jam?

It may be that the crew was acting primarily as “automation managers” and not remaining sufficiently engaged in actively flying the airplane. It would not be the first time that this has been a factor in an accident . In the final 2.5 min. of the flight, the NTSB says, “multiple autopilot modes and multiple autothrottle modes” were inputted—all while airspeed was allowed to drop far below the 137-kt. target. It also may turn out that software rules governing interaction of the autopilot and autothrottle in the 777 are not intuitive under some settings and problematic for landing (see page 25). But that would be no excuse for flying into the ground.

On balance, automation has been a major contributor to the safer, more efficient operation of airliners. But automation has not reached the point where it can handle all contingencies. We have not arrived at the point alluded to in the joke about the crew of the future being a pilot and a dog (the pilot is there to feed the dog, the dog is there to bite the pilot if he touches the controls). So humans must be prepared to hand-fly an aircraft at any point .

For years now, concern has been growing that airline pilot's basic stick, rudder and energy management skills are becoming weak due to over-reliance on automation systems. Pilots have become, in the words of Capt. Warren VanderBurgh of American Airlines dependent upon computers that generate the purple-pink cues on cockpit displays.

There is nothing inherently risky about using automation, he explains in a famous lecture, but there is a paradox about automation that crews must be aware of: In most situations, automation reduces workload. But in some situations, especially when time is critical, automation increases workload. For example, it is harder to rapidly and correctly reprogram a flight-management computer to avoid a midair collision than it is to turn off automated systems, grab the controls and take evasive action on one’s own.

This addiction to automation is particularly troubling because of the rapid growth of the international airline industry in the last two decades, notably in Asia and the Middle East. Many nations, including South Korea, do not have robust general aviation, light air freight and commuter airline sectors where pilots can amass hundreds of hand-flown takeoffs and departures, arrivals and landings before graduating to the cockpit of an Airbus or a Boeing airplane carrying scores of passengers.

In the wake of the Asiana crash , Tom Brown, a retired United Airlines 747-400 standards captain and former instructor of Asiana pilots , said in an email to friends that while he worked in South Korea, he “was shocked and surprised by the lack of basic piloting skills.” Requiring pilots “to shoot a visual approach struck fear into their hearts.”

Other expatriate training pilots who have worked in Asia and the Middle East tell similar stories about lack of basic head-up airmanship skills and preoccupation with head-down button pushing. They can perfectly punch numbers into the flight-management computer but if something unexpectedly crops up late in the flight, such as an air traffic control reroute close to the airport or a runway change, crews may not have time to punch, twist, push and flick all the controls required for the automation to make critical changes to the aircraft’s flight path. And head-down, they risk losing situational awareness.

This pitfall is not peculiar to developing regions, of course. Advanced automation can lull any crew into becoming mere systems monitors.

So what should be done? The automation dependency paradigm must be changed now. Crews must be trained to remain mentally engaged and, at low altitudes, tactility connected to the controls —even when automation is being employed. They should be drilled that, at low altitudes, anytime they wonder “what’s it doing now?” the response should be to turn automation off and fly by hand.

Aviation agencies need to update standards for certifying air carriers. There needs to be a new performance-based model that requires flight crews to log a minimum number of hand-flown takeoffs and departures, approaches and landings every six months, including some without autothrottle use. Honing basic pilot skills is more critical to improving airline safety than virtually any other human factor.

BELOW: Capt. Warren VanderBurgh’s 'children of the magenta' lecture (also viewable on VIMEO and UTube).