Boeing Nut Cracker - Loosening Stab Trim Wheel Nuts

Boeing Nut Cracker - two raised lugs fit firmly into their opposite number to enable the stab trim wheel nut to be easily loosened or tightened

Any industry has tools that have been designed for a specific task – whether it is for automotive, construction or aviation.  

Specialist tools enable a particular job to be accomplished quickly and effectively with the minimum of fuss.  More importantly, damage to a part is less likely when using a specialised tool. 

A person who makes tools usually has a trade certificate and those who are gifted in this area are called boiler makers; a gifted boiler maker can literally make anything.

Captain-side stab trim wheel nut showing recessed indentations on the nut.  The screwed rod (tip showing in photograph) is ~40 cm in length and is inserted through one of the  trim wheels, through the throttle quadrant, and is then secured by the unique nut on the opposite trim wheel

Stab Trim Wheel Nut

The stab trim wheels have two nuts that hold the trim wheels in place - one on each side of the throttle quadrant.  When attempting to remove the trim wheel nut it is a good idea to use a tool, as the nut can be easily damaged (burred).

The nut has two shallow indentations each side of it to enable it to be firmly tightened. 

Often the nut is over-tightened by the continual rotation of the trim wheels, or by an overzealous technician applying more force than they should.  If the nut has been over tightened, removing the trim wheels can be difficult. 

A common man’s blade screwdriver can be used to loosen the nut, by applying the blade to one side of the two indentations, grasping the trim wheel firmly and turning the driver.  But, do not be surprised if the recessed indents are damaged, the screwdriver slips and scratches something, or worse you end up with the blade of the screwdriver through your hand!

Boeing Specialised Tool

Boeing technicians use a specialised tool to loosen and tighten the nuts that hold the trim wheels in place – no doubt it also has a special name (?).  This tool, like all specialist tools is expensive, and more so because it is used in the aviation industry. 

I explained the problem to a friend of mine who like a ‘genie in a bottle’, designed and made this small tool for me.  It is not fancy or technical, but it does the job it has been designed to do especially well – every time. 

The tool is made from aluminium with two raised indentations that fit into the two recessed indentations on the trim wheel nut.  A simple shaft placed through a drilled hole in the stem of the tool enables the user to apply enough leverage to 'crack' all but the most resistant of trim wheel nuts. 

The heavy duty cog wheel that the trim wheels are secured to.  When removing the trim wheels it is very important not to dislodge the cog as the bearings on the inner side of the cog will fall out of alignment

Caution - Removing the Trim Wheels from the Main Shaft 

Whenever the trim wheels have to be removed from the throttle quadrant, it is very important not to dislodge the cog by pushing or pulling the shaft through the throttle unit.  This is relatively easy to do as often the trim wheels adhere to the cog.

Attached to the cog (inside the throttle unit) are several bearings, which if dislodged, will fall out of alignment.  The bearings are important to the correct functioning of the trim wheels and it is very difficult, if not impossible, to reinstall the bearings after they have fallen out of place.

When removing the trim wheels, carefully 'jiggle' the trim wheel until it works its way loose of the cog - never forcefully pull the trim wheel outwards as the cog and shaft may come out of the throttle unit, allowing the bearings to fall out of alignment.  Furthermore, be mindful that when you remove one of the trim wheels the other may rotate forward or backwards due to centrifugal force.

Before replacing the trim wheels, to help avoid the wheel from sticking to the shaft and cog, apply an amount of grease to the cog teeth.

Update

on 2016-05-26 00:01 by FLAPS 2 APPROACH

This tool has now been replaced with a new design with better engineering.  To read about the new tool:  Trim Wheel Nut Tool - New Design.

Freight Dispatched - Throttle Quadrant Australia Bound

A300-600 FedEx. Flaps2approach freight was dispatched on this aircraft (Maarten Visser from Capelle aan den IJssel, Nederland, N725FD A300-600 Fedex (4542200103), CC BY-SA 2.0)

It’s taken considerable time with frequent delays since I sold my earlier B737-300 series throttle quadrant, in October 2012, to make way for a replacement 600 series TQ with three-bay pedestal.

LEFT: FedEx. Copyright Bob Wood, Airplane Pictures.Net

As I expected, “scope creep” reared its head and the original requirements changed considerably over time.  It’s almost like leaving the house to buy a second hand car and coming back with a brand new jeep with all the accessories.

Use a Freight Forwarder

Freighting something as heavy and as large as a TQ, from the United States to Australia is not without cost and I’m fortunate to be in good stead with a competent Australian freight forwarder. 

A freight forwarder's job is to look after the logistics of getting the freight from point A to point B as expeditiously as possible.  Forwarders also complete all the required paperwork that is requested by customs authorities in both the country of export and import.  A good forwarder will do everything, albeit at a cost to you; however, the fee they charge is often worth the expense, as completing the required paperwork can be very difficult and if not correctly done will result in delays and storage charges.

Often a freight forwarder will sub contract his equivalent in the country of export to look after the exporting aspects of the freight.  A forwarder has access to any number of airlines and attempts to secure a freight rate that is acceptable to the client. 

Freight rates behave like shares on the stock market, and prices fluctuate widely depending upon the price of fuel, whether the freight can be back-logged (added to a pre-paid shipment belonging to someone else) or is dispatched stand alone.

How the Freight Industry Works

The way it works is quite simple – the freighter will charge you based on the cubic surface area or weight ($$$ / kilogram) of the crate.  The amount you pay is whichever is greater!  To this there are other charges added such as: airport fees, security fees, customs clearance fees, tax, import duties, airline handling fees, terminal fees, cargo automation fees, export clearance charges and a truck tail-lift pick-up fee.  This is above the actual cost per kilogram to send the freight and any domestic carriage, pick-up and storage charges.

You're probably thinking that sea freight is less expensive and you are correct; however, shipping terminal fees usually negate much of the saving, not too mention a lengthy wait time and a higher cost for insurance.

Carrier & Route Change - QANTAS then FEDEX

The freight industry is not a squeaky clean industry and under-the-carpet arrangements are commonplace.  If another carrier has space that is being sold at a cheaper rate, then your freight often will be shipped with the airline with the lesser expensive freight charge.  Unfortunately, this saving is not passed along to the customer, but equates to a higher profit for the freighter.  

The freight business have a term they use called "time sensitive", which basically translates to "we do what we want and you wait"!

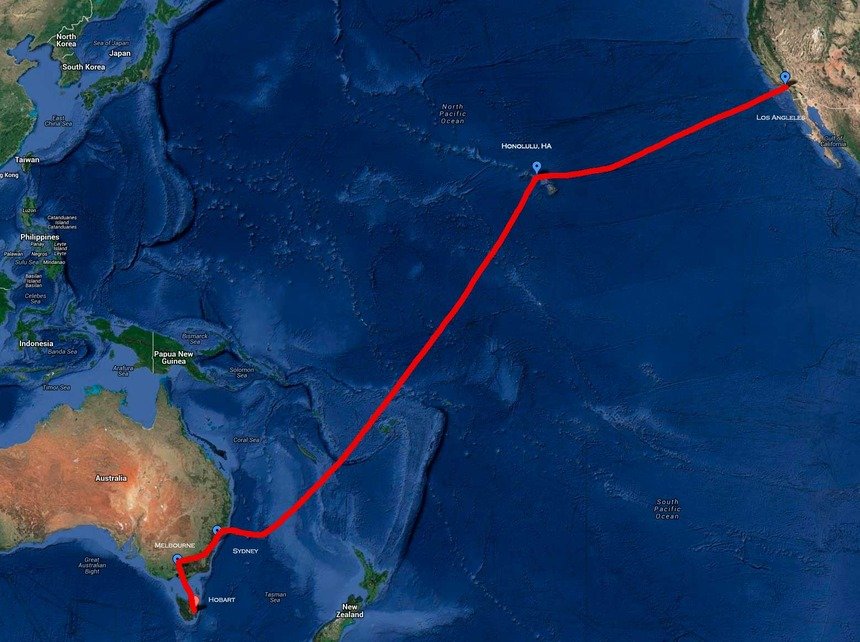
For example, my freight was supposed to be freighted with QANTAS for a quick Los Angeles – Melbourne (KLAX-YMML) flight followed by a domestic service further south to Hobart (YMHB). 

However, space became available with FedEx at a cheaper rate than offered by QANTAS and the Ameriican freight forwarder made a carrier and route change.  Instead of LosAngleles to Melbourne, the crate was dispatched via a FedEx MD11 from KLAX to Honolulu (PHNL).  From here it will travel via a Fed EX 747-400 through to Sydney (YSSY) and then onto Melbourne.  From Melbourne a domestic carrier will continue the pilgrimage to Hobart…

For the consigner (me), the longer a trip takes and the more times the freight has to be unloaded, stored and reloaded into another aircraft the higher the probability of potential damage.  If your wondering what could go wrong, think about how heavy freight is moved about - they use a fork lift!

At least FedEx, like DHL and UPS are specialists in moving freight.

Large Crate - Taking Advantage of Volume

I've spent considerable time over the last 10 months or so tracking down and purchasing genuine B737 OEM parts required for the simulator.  These have been stored at my friend's house and have been packed inside the crate along with the TQ.  The crate is full to the brim of "goodies" that will keep me busy for months... 

It's good to know I've saved considerable future postage costs and reduced the global carbon footprint by being able to add things to this shipment.

Impatient Wait

It’s an impatient wait, knowing that as I write the crate of “goodies” has landed in Sydney and has been transferred to Melbourne.  The next hop is to Hobart, Tasmania.  It's a fact of life that transporting anything to Hobart (an island state) takes a inordinate amount of time, so delivery is not expected to mid next week.

It's said that waiting builds character; "I seem to wait all the time....."

Oh and if your curious, the cost to send 110 kilograms chargeable weight from the US to Australia is $1453.00 AUD total.  Whoever said that building a simulator was cheap, should be "shot on the spot"!

I'm looking forward to getting back into construction mode and posting new progress updates, explanations and photographs.


Update

on 2013-08-15 22:23 by FLAPS 2 APPROACH

The crate has arrived....  It's much bigger than I anticipated.  This is the crate at the side entrance door to the house.. 

I had to make a winch and cradle system to enable me to get the crate, which weighs 110 kilos up and over the stairs and into the house.

At last, I now can get back into the construction phase of the simulator!

Time to find my wire, drill, clippers and multimeter.  There are so many OEM parts - which do I start on first.

Throttle Thrust Problem - Loosing Thrust at N1 - The Solution

oem 737-300 throttle

The throttle installed into the simulator is a converted genuine B737-300 throttle.  Lately, I have observed inconsistent power thrust issues during the take off roll and climb out. 

As I begin the take off roll, engage TO/GA and rotate, but before acceleration altitude or acceleration height is reached, one of the throttles looses or gains power.  Moving the throttle handle reinstates throttle power, but the power is dependent on where the actual throttle lever is physically positioned. 

When the aircraft is above thrust reduction altitude (1500 radio altitude) the problem rectifies itself.  The problem cannot be replicated when flying above 1500 feet.  I also noted, and this may also be part of the issue, that the power indicators located on the EICAS display fluctuate (twitch) a little as I moved the throttle levers.

This problem only began to occur after I transferred the avionics software to ProSim737.

Process of Elimination

Problems like this are not uncommon when interfacing real aircraft parts and the challenge is finding the cause of the problem.  The only method to determine solutions to problems such as this is to systematically, through the process of elimination, identify the problem area.

My first thought was that one of the potentiometers in the throttle quadrant maybe damaged, although I considered this to be unlikely as the units are still relatively new.  The throttle has four potentiometers: throttle 1, throttle 2, flaps and spoilers. Flight testing indicated that the power loss alternated between engine 1 and engine 2; therefore, the likelihood of two potentiometers failing at the same time was minimal. 

The next step involved checking the wiring within the throttle quadrant, to ensure there wasn’t damage to the outer coating of the wires.  A damaged or loose wire can easily short on the throttle frame and generate a spike.  However, if the wiring was loose or damaged, the problem would also occur when flying at altitude, and I had clearly demonstrated that the problem only occurred during the take off roll and climb out to thrust reduction altitude. 

The next step was to ensure that calibration of the throttle unit was correct.

Re-Calibration Using FSUIPC

I decided to re-calibrate the throttles using FSUIPC rather than FSX.  This process isn’t difficult and FSUIPC allows you to fine tune each throttle with greater accuracy than is possible with FSX. 

After re-calibration, the “twitching” of the power indicators ceased, but the initial problem remained.

The Cause of the Problem

The only culprit I could think of to cause this problem was ProSim737.

To check whether ProSim737 was actually the cause of the problem, it is necessary to remove any input from the ProSim737 software.  This is straightforward.  Either use another avionics software package or use FSX itself.  I did twenty trial flights using both Sim Avionics and FSX and the problem did not replicate. 

ProSim737 Excellent Support and Advice

I contacted the developers at ProSim737 explaining my problem in detail, and I received a response to my questions within a few hours.  Marty was especially helpful and we discussed several potential reasons for this issue and possible workarounds.  I must stress that the response I received from ProSim737 was absolutely 100% top notch. 

Marty genuinely wanted to help resolve the issue – whether it be with ProSim737 or otherwise.

Real B737 Throttle Operation

Now this where the comment “as real as it gets” does have meaning…. 

The developers of ProSim737 have designed their software to replicate the logic used by the real B737 auto throttle.  The software (ProSim737) is doing exactly what it’s supposed to do in relation to power thrust, and the issue I was experienced is caused by using a real aircraft throttle without automation.  Let me explain.

In the real aircraft, when TO/GA is enabled, the auto throttle logic has control of the aircraft.  The throttles are off-line and power thrust cannot be manipulated by the pilot.  The flight mode annunciator (FMA) illuminates N1. 

As 84 knots is passed the FMA changes from N1 to THR HOLD.  At this time, the actual throttles come back on-line, meaning that you can manually alter throttle power by moving the levers.  After rotation and at 800 radio altitude the auto throttle system is ready to change from take off power to climb power and the FMA changes from THR to ARM.  When in ARM mode the throttles are still on-line. 

When the aircraft reaches 1500 RA which is the thrust reduction altitude, the throttles go off-line and the AT logic is controlling the power thrust of the throttles.  The FMA changes from ARM to N1.

Throttle Anomaly

The B737 does not have a manual throttle, but an automated throttle.  The software is programmed to move the throttle levers to the correct position mimicking the actual power thrust called for by the auto throttle logic.

If you use a manual throttle (genuine or otherwise) the connection to the automated physical movement of the throttle levers is missing; you must counter this by moving the levers yourself.  This issue should not occur with a correctly calibrated automated throttle.

Using an Auto-throttle

If you have an auto throttle, the levers will automatically and physically move to the indicated thrust position as determined by the auto throttle logic (90%N1 at TO/GA).  When the FMA illuminates THR HOLD at 84 knots, and the throttles come back on-line for possible pilot intervention, the auto throttle logic will not sense any change in the throttle lever position, and power thrust (90%N1) will be maintained.   This is because the automated system placed the throttle levers in the correct position when TO/GA was initiated.

Using as Manual Throttle

However, if you’re using a manual throttle, the throttle levers MUST be physically positioned at the correct location on the throttle quadrant, otherwise the auto throttle logic will sense a change in position of the levers and alter the power thrust accordingly to this new level. 

This is what was occurring in my situation.  I was resting my hand on the throttle and only advancing the levers 3/4 of the way forward.  TO/GA indicated 90%N1, but when the throttles came on-line at 84 knots, the auto throttle logic noted that the position of the throttle levers was not at 90%N1 and subsequently altered the power thrust accordingly.

The reason the issue was inconsistent is that I didn’t always advance the throttle levers to the same position, and if I did the problem did not occur.

LEFT:  B737-300 throttle quadrant converted to Flight Simulator use.  The TQ is a manual throttle meaning that the thrust levers are not automated and must be moved manually.  I have used a pencil to lightly mark the metal adjacent to the most commonly used N1 settings.  This ensures the levers are moved the correct location during take off.  Lever position is set to 90%N1 and flaps 5.

Solution – Change in Procedures

The solution to this anomaly of using a real “manual” throttle is relatively simple.

You must determine where on the throttle quadrant the various N1 power settings are and then ensure, after engaged TO/GA that you move the throttle levers to the correct position (90%N1).  In my situation, the procedure is to advance the throttle to 40%N1, engage TO/GA, and then manually push the throttle levers to 90%N1.

Thank you

I’d like to thank Marty at ProSim737.  Marty worked with me to solve the issue, which ultimately was not really a problem with either ProSim737 or my set-up, but is an anomaly of using a genuine throttle unit without automation.

Possible Update

I may update the throttle quadrant to enable automation of the throttle levers and speed brake, however, for the time being the throttle quadrant will not include automation.

Update

on 2013-04-23 23:56 by FLAPS 2 APPROACH


diagram 1: a clear diagram that helps explain the problem discussed in the article (thanks to frazier @ prosim737 forum)


737-300 Telephone & Microphone for 737-300 Center Pedestal

737-300 internal communications

I have installed to the rear of the center pedestal the correct telephone and microphone for the 737-300 aircraft.  Neither item is necessary, but it adds to aesthetics and fills the empty gap where the telephone should have been installed.  Although the telephone and microphone are functional, they have not been configured to operate with the avionics suite or flight simulator.

The center pedestal and telephone are not from a 737-800 aircraft, nor would they ever be seen on a Next Generation aircraft; they fill a gap until the respective OEM components can be found.

Sometimes it’s a matter of what is available, or waiting until a part becomes available. In this case, I decided to use what was available.

This type of telephone and microphone (as well as other types depending upon manufacture) were used on the 737-300 through to the 737-500 aircraft.

As you can see from the photograph, this telephone has been there and done that!  The telephone is considerably scratched, but I prefer using part that shows service, rather than using a shinny new reproduction item.

Video - Operational Trim Wheels & Indicators

Now that the throttle quadrant is operational, USB hubs working and the Phidgets correctly configured, I thought I’d post a short video clip showing the trim wheel operation.  The wheel spin is controlled by inputs either from the auto pilot or from electric trim switches located on the yoke.  When the wheels spin, there is corresponding movement of the trim wheel indicator tabs; the indicators, which are coloured white show the pitch of the aircraft.

Currently, the trim wheels spin at only one speed (mono-speed adjustable in the Phidget settings).  Later on, when I have time I'll be altering the speed to variable-speed  This will allow the wheels to spin at differing speeds dependent upon whether the aircraft is being controlled manually or by the autopilot.  This configuration requires some extra time with Phidgets and is not essential at the present time.

The trim wheels are connected to a 12 volt DC servo motor.  The motor is mounted inside the throttle quadrant near the actual wheels. To control the power to the servo motor I have used a Phidget advanced servo motor controller.  Double click video to view full screen.


Safety First

The trim wheels have a white line painted on them for a very good reason (not invasion markings for D-Day 1944).  The spinning wheels are dangerous – keep your fingers well away when they are operational!  The white line, when spinning acts as a visual warning to pilots that the wheels are spinning.  It also provides a means with which to calibrate the rotation speed of the trim wheels.  Each wheel also has a pull out handle that can be used to control trim manually.  Like your fingers, if your knee is in front of the handle when the wheels spin expect a solid whack on your knee cap.  I’ve been told by a real world B737 Captain, that there have been several occasions when pilots have suffered injuries to knee caps from being whacked by spinning wheels, after inadvertently leaving the handle extended.  As for me, well when they first "spun" into action the cup of coffee that was resting slightly against the wheel spun across the floor  :)

Stab Trim Switch Cut Out

As you can image, spinning trim wheels can be slightly annoying and very noisy – especially if you’re flying at night and others in the house are attempting to sleep.  Therefore, to stop the trim wheels spinning, I have programmed the trim stabilizer (stab trim) switches on the throttle quadrant to cut the power to the servo motor.  Push the stab trim switches to normal and the wheel spin; push the switch down and spinning stops.  Although the spinning stops, the trim indicator tabs still move.

In a real B737 this switch is used to stop run away trim wheels, so there is a certain amount of authenticity connecting this functionality to this switch.

Trim Tabs – Why Are They Important?

The use of trim tabs (elevator & pitch) significantly reduces pilot’s workload during continuous  flight maneuvers (sustained climb to altitude after takeoff or descent prior to landing), allowing them to focus their attention on other tasks such as traffic avoidance or communication with ATC.

Trim affects the small trimming part of the elevator on jet airliners. Trim (controlled by the trim switch on the yoke) is used all the time after the flying pilot has disabled the autopilot, especially after each time the flaps are lowered or at every change in the airspeed, at the descent, approach and final.   Trim is most used for controlling the attitude at cruising by the autopilot.

Correct trim frees the pilot from exerting constant pressure on the pitch controls for a given airspeed / weight distribution. Typically, when the trim control is rotated forward, the nose is held down; conversely, if the trim wheel is moved back, the tail becomes heavy and the nose is held high.

Trim Tabs - Technical Hype (the basics)

When a trim tab is employed, it is moved into the slipstream opposite to the control surface's desired deflection. For example, in order to trim an elevator to hold the nose down, the elevator's trim tab will actually rise up into the slipstream. The increased pressure on top of the trim tab surface caused by raising it will then deflect the entire elevator slab down slightly, causing the tail to rise and the aircraft's nose to move down. In the case of an aircraft where the deployment of flaps would significantly alter the longitudinal trim, a supplementary trim tab is arranged to simultaneously deploy with the flaps so that pitch attitude is not markedly changed.

Sticky Autothrottle Button - Repaired

oem autothrottle button. note the circular circlip

I noticed soon after the throttle quadrant arrived that the engine number one auto throttle button was a bit sticky.  Depressing the button, it would stay pressed in for a few seconds even though pressure had been released.  The autothrottle buttons are one-way buttons meaning that they are click buttons.  It’s probable that after many hours of service, sweat, dead skin cells and dirt has built up on the inner button behind the spring mechanism; a friend suggested that DNA analysis of the built up debris would probably provide a list of suspect pilots!

Whilst the button was still in place, I attempted to loosen the built up material using a can of pressurized electronic cleaner fluid.  The fluid, I hoped would dislodge any loose material before evaporating.  Unfortunately, this didn’t work in the long run, although once lubricated with the evaporate solvent, the button operated correctly for a short time.

oem autothrottle button removed

Circlip

The button is held in place within the throttle handle by a ½ inch circlip.  Beneath the circlip and button there is a spring mechanism that pushes the button out after being depressed.  Using a pair of circlip pliers, I very carefully removed the circlip making sure that the spring mechanism of the circlip didn’t propel my button out the window and into the garden! 

With the circlip removed, the inner portion of the throttle handle slides out revealing the button and attached wiring.  The button is a modular design (shaped to fit inside the throttle handle) and unfortunately cannot be disassembled further, Therefore, I reassembled the button and sprayed a small amount of silicone spray around the button, allowing the silicone solution to penetrate around the the edge of the button. 

The silicon lubricant (which is non conductive, so there is no issue with power shorting) seems to have solved the problem as the button no longer sticks, however, this is only an interim solution.  I'll search for a replacement button module.  Sometimes the most simple solution will fix your problem.

No doubt I can purchase a new replacement from Boeing for err $800.00....  I think not.  Eventually I'll find a disused button module in my travels.  

Powering, Wiring and Configuring the 737-300 Throttle Quadrant

oem 737-300 throttle quadrant. installation of phidget 1064 interface card is to the forward bulkhead

The picture shows the front of the throttle quadrant with the attached 0064 and 0066 phidget cards and the BUO 836X Leo Bodnar card.  I thought this to be the best location for attaching the cards rather than having them either sit loose or be mounted on a separate board.  The wiring and cards will not be visible when the quadrant is sealed against the front of the main instrument panel (MIP). However, if servicing is required, access to the cards and wiring can easily be achieved via the front of the MIP.

The Phidget cards are required to provide functionality to the trim indicator, motorizing of the trim wheels (via a servo motor), and to allow the deployment of the auto speed brake.

Different Voltages Required

The throttle quadrant requires different voltages to operate correctly.  Apart from the obvious USB power through the USB cable connected to the cards, external power is supplied via a standard style computer power source, rated to 400 watts.  To reduce the main power, which is 240 volts in Australia, to that required by the phidget cards and integrated back lighting (IBL); I installed a bench top power board kit.  This small kit comes unassembled in a box direct from China.  Assembling the kit and card isn’t difficult but it does taken considerable time to solder all the terminals in place.  The bench top kit allows the power from the computer power source box  to be reduced to: 3.3 V, 5 V, +12 V and -12V.  Each power selection is protected by a 5 amp in-line fuse.  In an attempt to try and maintain neatness I mounted this card directly to the power source box. 

Functions on the throttle quadrant that require power are:

  • Integrated back lighting (IBL – aircraft bulbs) – 5 volts

  • Main parking brake light – 12 volts

  • Fire suppression module backlights and handle lights – 5 volts

  • Speed brake servo.  Phidget controlled servo motor - 5 volts & 12 volts

  • Trim wheels (spin when electric trim is activated from yoke) Phidget controlled servo motor – 12 volts

  • Lighting on/off switch (TQ IBL only) – 5 volts

  • Hobbs meter (to indicate length of time TQ has been operational) – 24 volts (12V + 12V)

connecting wires to power distribution board

The other avionics that will be installed into the avionics bay are powered directly via USB (unless real aircraft modules are used)

I wasn’t exactly sure what the amperage draw was from the servo motor (that spins the trim wheels and activates the speed brake).  Therefore, to connect the external power through the bench-top power kit, I decided to use 10 amp wire. I have a sneaky suspicion that 10 amp rated wire is overkill for the task, but at least I know it won’t melt.

If you want to view more detailed images, please navigate to the image gallery and select construction

Phidget & Leo Bodnar Card Programming

power distribution board positioned above computer power supply

Most of the buttons and levers located on the throttle are assignable to standard flight simulator controls through the windows joystick controller (or Leo Bodnar card).  But, those throttle functions that are controlled by a phidget card, initially require mapping through a registered version of FSUIPC, so that they can be seen within the phidget's interface to allow assignment and configuration.  I used a FSUIPC profile to map the functions controlled by phidget cards, which were: the trim indicators, trim wheels and speed brake. 

I'll be the first to admit that my knowledge of phidgets is lacking; Until recently I couldn't spell the word.  With the help of a very kind person from northern California who is exceptionally knowledgeable on phidgets my worries were soon overturned - at least for the time being.  During a two hour telephone hook-up, the correct computer drivers and phidget libraries were installed on the computer and the attached phidget cards on the throttle quadrant were programmed to the required throttle quadrant fields with various FS variances and offsets (after they were mapped in FSUIPC). 

As with many software related products, there was a bit of troubleshooting and configuration that needed to be done, but nothing too drastically complicated.  It all seems quite easy when you know how.

The throttle now has full functionality with the exception of the automatic deployment of the speed brake on flare and touch down.  This requires an additional Phidget card (004 card) which has four relays that can be computer controlled.  The relay is needed to activate the squat switch to turn off the servo motor allowing the speed brake to deploy.  This additional Phidget card will be installed shortly.

It was quite amusing when we programmed the phidgets to the trim wheel movement.  I hadn't expected the movement and was leaning on the trim wheel while discussing the issue on the phone.  BANG WHIRL as the trim wheel began to spin at a high number of revolutions.  The movement and noise startled me and I almost fell from my perch!  The TQ shook madly as the trim wheel rotated (as it isn't yet screwed to a platform) - I can now understand how real world pilots spill their coffee!

Programming the Leo Bodnar card was straightforward; this card follows the standard for windows joystick controllers.  Essentially, you just follow the screen prompts and allocate button functions to whatever devices you choose.

One aspect that required careful attention is to check that the flight simulator controls are not duplicated in either the  phidgets, Leo Bodnar, yoke, or other joystick controller settings.  duplicate settings will cause problems.

Throttle Functionality Includes:

  • Independent forward and reverse thrust to engine 1/2 throttles

  • Speed brake arming

  • Speed brake flight deployment (spoilers)

  • Speed brake deployment on flare & touch down (requires another Phidget card)

  • Trim wheel rotation/revolution when trim applied

  • Trim wheel indicator functional and moving when electric trim is activated from yoke

  • Park brake and light

  • Cut off Levers (fuel idle & cutoff)

  • Flaps

  • TO/GA button functional (to go around)

  • A/T disengage functional (auto throttle)

  • All IBL backlighting functional

The stab trim switches I have had wired in such a way to stop the trim wheels from spinning.  Although the spinning trim wheels are accurate to the real aircraft, they can be annoyingly noisy, especially at night when others are trying to sleep.  To disengage the trim wheel motor from the spinning trim wheels,  I flick the stab trim switch.  To activate the them again, I reverse the process.

The horn cut out switch is currently not connected to throttle functionality, however, can be allocated to another flight simulator function if required.

Fire Suppression Panel (FSP)

A communication error with my friend, who was converting this panel to flight simulator use, means a little more work is required to add flight simulator functionality.  At the moment I have power running to the handles causing the lamps to be lit all the time, and some of the module buttons to be back lit.  To my knowledge, the handles should only light when the backlighting is switched on or when they are activated.  I still have the original Boeing circuit boards and solenoid switches, and although I haven't given the matter a lot of thought, I believe that it should be possible to connect a Phidget 004 card, which has relays, to allow activation of APU and fire handles via the original solenoid switches.  I'm not quite sure on how to activate the buttons and switches - perhaps FSUIPC offsets and phidget software.  Rome wasn't built in day, so more on this later.

B737-300 Throttle Quadrant & Center Pedestal - Arrived at Last

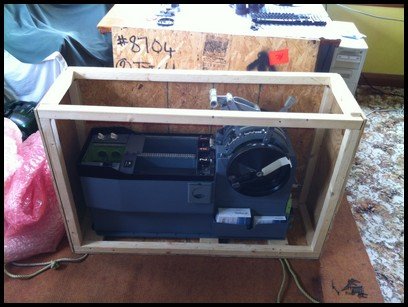
A big orange truck from TNT Express parked outside the house this afternoon and the driver began to offload a large wooden crate that weighed around 80 kilograms.  I could be only one thing – the Boeing throttle quadrant and avionics box (center pedistal) had finally arrived.   

Together, the driver and I manhandled the crate through the hallway of the house to the room in which construction of the simulator is taking place.  Removing a heavy piece of machinery from a wooden crate can be tricky, and the only method was to disassemble the box screw by screw – WOW what beauty!

Initial Thoughts

The throttle and avionics bay is a genuine aircraft part so there wasn’t much to not like; you can’t “immerse” yourself or get a more authentic experience than by using a real aircraft part.  The throttle originally was in use in a Boeing 737-300 with South West livery.  Unfortunately, the guy at the tear down yard didn’t document the tail number of the aircraft it was removed from.  It would have been nice to have a photo of the actual aircraft to place on the Blog.

The first aspect I noticed about the throttle was the build.  It’s a solid piece of engineering built to withstand the neglect of pilot use and now simulator use.  I don’t believe the throttle will ever be damaged from neglect my end – its’ solidly constructed.  The feel when you push the two power levers forward is - well – you just have to be here!  Manoeuvring the flap lever through the various indents is equally rewarding.  Knowing that the throttle was once used in a real aircraft by real pilots adds a completely new dimension to flight simulation.

Retrofitting and Connectivity

During the refurbishment of the throttle, I had decided to not bastardize the throttle to try and replicate the appearance a throttle from a Boeing NG.  Therefore, the throttle remains a 300 series throttle.  It has been repainted only where necessary and decals have been replaced only when they were unreadable.  The internal mechanism of the throttle has been completely striped, cleaned and serviced.  Parts, such as the huge cog wheels and unnecessary internal wiring have been discarded as these are not required for simulation use. 

To allow the throttle to connect correctly with flight simulator, three Phidget cards (0066 & 0064) & a Leo Bodnar card (BUO 836X) have been used.  The cards are connected directly to the front of the throttle casing and will not be visible once the throttle casing is connected to the centre stage of the main instrument panel (MIP). 

All the functions of the throttle operate with the exception of the stab trim switches, which can be linked to another FS function if required.  Trim wheels are functional with the use of a servo motor and the trim spins when electric trim is activated on the yoke.  Back lighting is integrated back lighting (IBL) using genuine Boeing 5 volt bulbs.

oem 737-300 throttle quadrant - initial thoughts: it’s built like a thunderbox

Current Status

At the moment I’ve only taken delivery and am in the process of connecting a Benchmark card to an external power source to allow power to reach the 5 volt lighting bulbs and servo motors.  I have little doubt that there will be teething issues with software as I configure everything for correct functionality, but I believe that this extra effort is worthwhile to be able to use a real throttle instead of a replica.

Center Pedestal

The avionics bay is a two-bay type.  Two-bay types were mainly used on the earlier Boeing classic series jets up to the 200 series, however, a number of 300 series aircraft used them as well as 400 series.  The bay was attached to the throttle when I bought it, so rather than dump it and replicate a NG three-bay; I’ve decided to use it to maintain authenticity.  I may at some stage in the future replace it with three-bay – I’ll see how things develop once I begin to populate the bay with avionics instruments.  One benefit of using a two-bay style is that once Weber seats are fitted to the flight deck there will be more room to squeeze past to get into the seat!

An interesting feature to the unit is the positioning of two oddly shaped aluminium pull downs.  At first, I had no idea what these were used for.  Then it dawned on me – they are retractable coffee cup holders.  What more can you ask for (laughing). 

oem 737-300 fire suppression panel

Fire Suppression Panel (FSP)

The fire suppression module was an afterthought.  A second hand unit was available and I decided to retrofit this with limited functionality to flight simulator.  At the moment IBL works, and when pulled, each fire handle does what it’s supposed to do.  At some stage in the future I may activate the fire bell.  But, at the moment it’s early days with regard to this.  Basically it’s a module that has to be installed into the avionics bay for aesthetics; a TQ without a fire suppression module looks a slightly naked.

More on the actual avionics bay at a later stage when I begin to populate the bay with instruments - much kmore interesting than looking at "naked bay"

Throttle Quadrant & Center Pedestal on the way (finally)

The QANTAS strike in Australia has sure left me stranded - not personally but with freight.  Even though flight operations were only cancelled for a few days, the backlog of freight and essential cargo that has been delayed is staggering. It just proves that Australia really does need another major airline so that Qantas does not hold the nation to ransom.

Throttle Quadrant and Center Pedestal

After almost a month in transit (who said air freight was fast), the 737 throttle quadrant and center pedestal has arrived in Sydney, only to be sitting on the floor of the Qantas warehouse for a week!  My customs forwarder advised me on Friday that Qantas finally has released the freight for dispatch to Melbourne then onwards further south to Hobart.  Arrival time is mid next week (touch wood).

Main Instrument Panel

The main instrument panel, I have been reliably told by Peter Cos of Flight Deck Solutions, has been wired and will be ready for dispatch later next week.  I'll ensure this freight is NOT sent via QANTAS - maybe DHL.

In the interim, whilst waiting for freight to arrive, I've been kept busy setting up the two computers and learning about networking in Windows 7.  After many hours, it seems that many of these matters are now well on their way to be solved.  I've also been spending considerable time researching the various flight models that can be used with Sim Avionics.

It will soon be time to begin the build phase of the project.

OEM 737-300 Throttle Quadrant

oem 737-300 throttle quadrant in tear down yard

I was surprised to find an OEM throttle quadrant, at more or less the same time that I was about to purchase a reproduction throttle.

The throttle quadrant was used in a South West 737-300 series airframe and has a two-bay center pedestal.  The two-bay pedestal will suffice until a three-bay pedestal can be found.

The pedestal still has undamaged DZUS rails so it should be an easy matter to drop in avionics panels (radios, etc).

Proposed Conversion

The Throttle quadrant will be completely dismantled, cleaned and serviced.  Parts that are not required for simulation will be removed.  The lower section of the throttle and center pedestal will be removed as this is not necessary when installing the items to flat platform.

Any cards and other items needed to convert the throttle for flight simulator will be either mounted forward of the throttle on the forward bulkhead, or be hidden from sight in the center pedestal.  USB cabling will be routed along the lower side of the throttle to emerge from the forward bulkhead, and then will be connected to a computer.

The throttle will be converted using Phidget cards and servo motors.

Although the throttle is not going to be motorised (the thrust levers will not move automatically), the use a a DC motor will enable the trim wheels to rotate and the trim tab indicators to move.

Finally, a fresh coat of paint will be applied to the throttle and pedestal and any damaged transfers replaced.

oem 737-300 throttle quadrant in tear down yard

Original Equipment Manufacture (OEM)

A major advantage when using an OEM component such as a throttle is the added realism and immersion, not too mention that it's almost impossible to break an OEM throttle. 

One thing that I found interesting when searching for the throttle quadrant, was the number of throttles that are superficially damaged or are in poor condition.  Often the throttle and pedestal is scratched, dented and stained.  Investigating this further, I learnt that it's not so much the pilots that are doing this, but the dismantling crews.  Throttles are heavy and unwieldy and a dismantling crew has little time to worry about scratching a throttle that is probably going to scrap.

I have been fortunate in that the throttle and pedestal had been removed from the scrapped aircraft relatively carefully.

The pictures shown here were sent to me by the company who dismantled the aircraft.

Update

on 2020-07-14 23:24 by FLAPS 2 APPROACH

I've just received an e-mail from Florida stating the TQ has landed safely and in good order.  Next will be the transition from a scraped throttle quadrant to a working unit.  The timeline for the conversion is around 3-4 weeks.  If everything works out as anticipated, and freight is not delayed, I am expecting delivery to Australia sometime in early October.  Everything is green for go!  :)

Update

on 2020-07-14 23:27 by FLAPS 2 APPROACH

737-300 series throttle dismantled for cleaning.  You will immediately notice the massive internal cogs that control the internal mechanism; it makes a Swiss watch mechanism dim by comparison

After returning from a work trip to east Africa, I have been told that the throttle quadrant has been refurbished and wired to connect to flight simulator.  All that's remaining is to repaint it to Boeing grey.

Rather than repaint the actual throttle levers and knobs in white to replicate the colour scheme used by a Next Generation throttle, I have opted to leave the colour of the handles as they are.  The levers and knobs of the throttle (after cleaning) were in exceptionally good condition, and it seems a shame, almost criminal to repaint them.

Therefore, although the MIP is a simulation of a Next Generation airframe, the throttle quadrant will remain as a 300 series quadrant.  In many respects, simulation is about compromise, and to destroy an historical 300 series throttle to replicate a Next Generation throttle doesn't seem the right thing to do. 

Update

on 2020-07-14 23:32 by FLAPS 2 APPROACH

Not long now...   I spoke with my friend in Florida this morning and he informed me the throttle conversion has been completed. 

The throttle will soon be travelling as cargo to Australia either by United Airlines or Qantas for I hope a late October delivery.

Update

on 2011-10-16 07:10 by FLAPS 2 APPROACH

The throttle quadrant is finished and is finally in the air winging its way from the US to Australia.  After a stint in Australian Customs, it will then be send across Bass Straight and on to Hobart - its new home.  The next phase will then be the addition of avionic panels to the pedestal and connection and configuration to flight simulator.

Genuine 737 Throttle Quadrant - Found One

oem 737-300 throttle quadrant as removed from aircraft

After considerable research I've learnt there are very few reproduction throttles that match the functionality and robustness of the OEM throttle.

Revolution-Sim, a company in France appears to produce an exceptionally well designed quadrant, however, not with an inexpensive price tag.  Contacting Revolution-Sim is also difficult as they do not respond to e-mails.  ThrottleTec produce a very good intermediate throttle that is reasonably priced, however, the throttle's appearance is different to the OEM throttle and it looks like a toy.

Fortunately, I have been able to find an OEM 737 throttle from a aircraft tear down yard.

If I manage to purchase this throttle, my intention is to refurbish the throttle and have it retrofitted, using Phidgets, to function with flight simulator.  How this will be done eludes me for the time being.

Although motorizing the throttle so that the autothrottle moves the thrust levers is the holy grail I have been reliably informed that attempting to do so will probably cause more problems than it's worth.  Therefore, the throttle will not be motorized.   This doesn't concern me greatly as most of my virtual flying is done manually (hand flying).

I must confess that the feel of a real throttle in your hand leads no limit to the imagination!