How to Customise Text When ProSim737 Opens in MSFS-2020

JAL 737-800 departing Toyama (RJNT) Japan

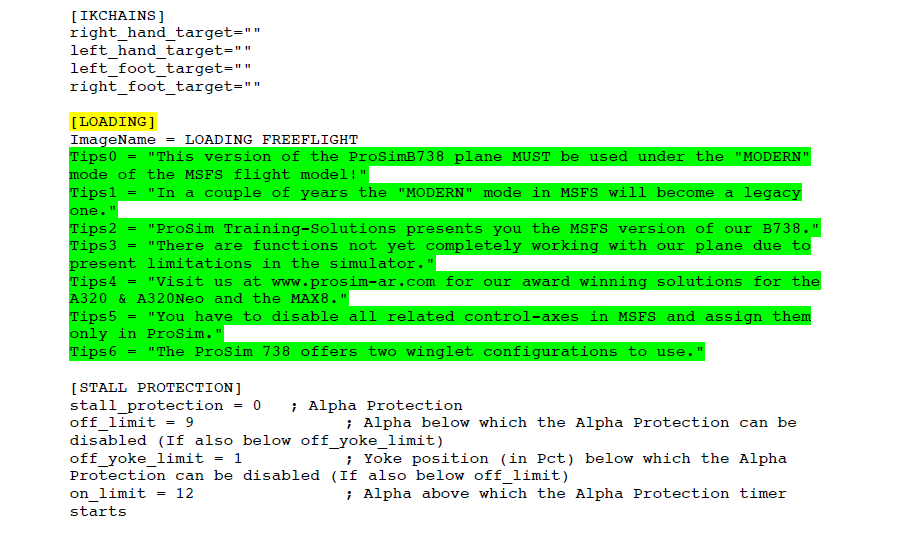
A somewhat annoying aspect of using ProSim737 in MSFS-2020 is that when MSFS initiates the loading of the 737 livery (by pressing Fly Now) a long message is displayed across the lower screen.

While the displayed text serves a purpose, it becomes redundant after repeated viewings.

Many users have asked if it is possible to remove this message or replace it with customised text. 

The displayed text:

  • This version of the ProSimB738 plane MUST be used under the "MODERN" mode of the MSFS flight model! 

  • In a couple of years the ‘MODERN’ mode in MSFS will become a legacy one. 

  • ProSim Training-Solutions presents you the MSFS version of our B738. There are functions not yet completely working with our plane due to present limitations in the simulator. 

  • Visit us at www.prosim-ar.com for our award winning solutions for the A320 & A320Neo and the MAX8. 

  • You have to disable all related control-axes in MSFS and assign them only in ProSim.  The ProSim 738 offers two winglet configurations to use.

Steps to Edit the Aircraft.cfg File

To remove or alter this text, you must edit the aircraft.cfg file. This file is part of the Visual Flight Model.  The aircraft.cfg file can be found at:

Community Folder/Aircraft/Prosim-B738-v2023/Simobjects/Airplanes/Prosim-b738-2023.

  1. Create a backup of the aircraft.cfg file.  You can copy the folder and rename it to something like aircraft_backup.cfg, though you can use any name you prefer. 

  2. Open the aircraft.cfg file in a text editor and scroll to the section named [Loading].

  3. Modify or delete the lines named Tips0 through Tips6

    • To remove the displayed message, delete the lines labelled Tips0 through Tips6. This will prevent any message from being displayed.

    • To replace the text, edit the content of Tips0 through Tips6.  For example, to display only one line of custom text, edit Tips0 and delete the remaining lines.

  4. Remember to include the quotation marks each side of your written entry.

In my simulator I have removed the entries and replaced them with: Tips0 = "Aircraft Loading (Boeing 737-800) - Flaps 2 Approach"

Documenting Edits  

After making changes to the aircraft.cfg file, it is good practice to document them at the top of the file. Use // before adding comments, as lines prefixed with // are ignored by the computer system.  

For example, // Edited on 20-11-2024: Removed default loading tips and added custom message.  

Important Point:

  • If the Visual Flight Model is reinstalled or updated, the aircraft.cfg file will be replaced. You will need to reapply your edits. To simplify this process, keep a copy of your modified file to quickly copy and paste your changes into the updated file.  

Final Call  

Editing the aircraft.cfg file enables you to remove or customize the message to better suit your preferences, however, although this is a straightforward task, it is important to create a backup of the file prior to making any changes.  

BELOW: Gallery showing aircraft.cfg edits.

Updating Magnetic Declination in MSFS-2020

Sometimes, the aircraft during an approach does not correctly align with the runway heading published on the approach chart. This can lead to a RW/APP CRS Error to be displayed on the FMA.

Before exploring scenery, navigational database and add-on inconsistencies, the problem may be that the magnetic declination in flight simulator is not correct for the runway or scenery being used.

The magnetic declination forms part of the database table that relates to any scenery (and airport runway) used in flight simulator.

I have written about magnetic declination in two earlier articles, however, these articles related to FS9 and FSX and not MSFS-2020.

Magnetic Declination

Simply explained, magnetic north is the direction that the north end of a compass needle points, which corresponds to the direction of the Earth's magnetic field. True north is the direction along a meridian towards the geographic North Pole. The magnetic declination (also called magnetic variation) is the angle measured between true north and magnetic north.  This distance changes annually and is one of the reasons that a topographic map has a declination table printed in the margin. Without a declination table, the map would soon become inaccurate.  To calculate the magnetic declination the map user, depending upon their position, would add or subtract the declination from the bearing to obtain an accurate bearing to plot a course.

Flight Simulator

The magnetic declination used by flight simulator is stored in a .bgl file named magdec.bgl. This file is usually located in the simulator’s scenery database.  The file is accurate at the time of development, but if not updated regularly will be incorrect for today’s date.

You would expect magnetic declination errors with flight simulator platforms such as FS9, FSX and earlier versions of P3d; after all, they were released several years ago, but deviation errors are also seen in MSFS-2020.  The reason for this is that Microsoft did not compile a new magnetic declination table when the scenery was developed; rather, they used the existing table from FSX.  The exception being for some of Asobo’s airports which probably do have up-to-date declination.  

Considering that MSFS-2020 is automatically updated, it would have been a relatively easy task to also update the magnetic declination (perhaps in the future).

Updating Magnetic Declination

Updating the declination for MSFS-2020 involves replacing the magdec.bgl file with an updated file.

This file can be downloaded free of charge from Herve Sor’s website (the .bgl file is regularly rewritten to reflect declination changes).  Be sure to read the accompanying Read Me file for further information.

Locating the .bgl file (MSFS-2020)

The magdec.bgl file is located in the following directory: 

  • C:\Users\LOGINNAME\AppData\Local\Packages\Microsoft.FlightSimulator_8wekyb3d8bbwe\ LocalCache\Packages\Official\OneStore\FS-base\Scenery\Base\Scenery

Note that if you have done a custom install of MSFS-2020 to a different drive, then the folder structure should represent the location you have installed the software.

If using Steam, the folder structure is:

  • C:\Steam\Steamapps\Common\MicrosoftFlightSimulator\Official\OneStore\fs-base\Scenery\Base\Scenery\

Installing the .bgl file

Find and open the scenery folder.  Prior to changing anything, always make a backup of the existing magdec.bgl file.  Be sure to remove the .bgl file extension.  I would suggest renaming the file to magdec_backup_original.  This enables you, if necessary, to easily roll back the file (after changing the file name back to the original name).  The backup file can either remain in the folder or be removed to another location for safe keeping.  Next, copy and paste the new magdec.bgl file to the folder.  When you open flight simulator the magnetic declination table will be rebuilt during the start-up process. This may take a few minutes.

Important Point:

  • After downloading the zip file from Herve’s website, open and read the Read Me file which provides additional information.

Other Simulator Platforms

To update the magnetic declination for other simulation platforms, ensure you download the correct updated magdec.bgl file for the simulator being used.  The installation route is usually the Scenery/Base/Scenery folder.

Magnetic declination is important. The declination information for the approach chart and the simulator must be identical (Aero Icarus from Zürich, Switzerland, Runway of Funchal airport, July 11, 2011 (5939970718), CC BY-SA 2.0)

Do I Need To Update ?

The flight simulator can only reproduce accurate navigation based on the quality of the installed database. If you are using Navigraph data and your simulator’s declination is not correct, a corresponding error will occur between Navigraph and the scenery in the simulator.

If you use an approach chart, the magnetic declination record between the chart and the simulator must be identical; otherwise, the approach course will be inaccurate (landing left or right of runway).  Likewise, if you are using Lateral and Vertical Navigation (LNAV and VNAV) and have the incorrect declination, the aircraft will not fly the correct course during an automated approach (for example an RNAV approach).

The update is a very simple process and takes but a few minutes and it is strongly recommended.

Final Call

Magnetic declination is a critical factor to consider, before investigating other potential causes for navigational discrepancies. To ensure accurate navigation ensure the magdec.bgl file is up-to-date.

Glossary

  • FMA - Flight Mode Annunciator.

Batch Files to Open and Close Flight Simulator

Opening and closing the various files and ancillary programs to operate a flight simulator can be onerous and time consuming.  While there have been several programs released that enable you to launch flight simulator with a press of a key, they seldom work with complicated platforms such as flight decks. 

One of the most commonly used methods to open files and programs is to use the start menu within Windows.  However, this is not without it’s shortcomings, and specialist knowledge is required.  An easy and trouble free approach is to use batch files.

What is a Batch File

A batch file is a script file that stores commands to be executed in a serial order.  It helps automate routine tasks without requiring user input or intervention. Some common applications of batch files include loading programs, running multiple processes or performing repetitive actions in a sequence in the system.

Also known as a batch job, a batch file is a text file created in Notepad or some other text editor.  A batch file bundles or packages a set of commands into a single file in serial order.  Without a batch file these commands would have to be presented one at a time to the system from a keyboard.

Usually, a batch file is created for command sequences when a user has a repetitive need.  A command-line interpreter takes the file as an input and executes the commands in the given order.  A batch file eliminates the need to retype commands, which saves the user time and helps to avoid mistakes.  It is also useful to simplify complex processes.

Windows usually uses the .bat extension for batch files.

Whilst there are several methods that can be used to write a batch file, I have found that the examples below operate flawlessly.

Writing a Batch File

It's a simple process to write a batch file. 

Prior to beginning, it’s wise to think about the order you want the programs to open, and whether you want a pause between opening particular files and programs.  While a pause is probably not necessary, it’s a good idea as it allows a file or program to complete its opening sequence, prior to the next file or program opening.

When you have completed writing the batch file in notepad save the file with a .bat extension.  To test the batch file double click on the saved .bat extension.

Although others will disagree, I always open the MSFS-2020 or P3d and allow the program to settle before opening any batch file or other programs.

The following examples of batch files are user-specific.  You will need to substitute the file structure with the file structure you are using.

Opening Files and Programs

  • An example of a batch file to open the main flight simulator computer (server).

@Echo  off

//Alpha Main Server Computer (ALPHA-SERVER-P3)  - 09:38 - 25/08/2023

//ProSim738 V3

//ProSim Ancillary Programs

start /d "D:\Flight Simulator Files\SimStacks October 2021\SimStackSwitchv702" Switch.jar

Timeout 0.5

start /d "D:\Flight Simulator Files\FS Set Volume" FSSetvol.exe

Timeout 0.5

start /d "D:\Flight Simulator Files\SimSounds 4.0" SimSounds.exe

Timeout 1

start /d "D:\REX WeatherForce.exe

//ProSim Main Programs

start /d "D:\Flight Simulator Files\ProSim738 V3\ProSimAudio" ProsimAudio.exe

Timeout 1

start /d "D:\Flight Simulator Files\ProSim738 V3\ProSimB738" ProSimB738.exe

An example of a batch file to open the avionics suite on the second computer (client 1).

@Echo off

//Client 1 - ProSim-AR B738 Avionics Suite V3    14:07 5/09/20

//PS738 V3

//Ancillary Programs

start /d "C:\Users\user name\Documents\FSF\Programs\MSFS WideFS7" kilo

start /d "C:\Users\user name\Documents\FSF\Programs\Landing Rate Monitor" LRM.exe

start /d "C:\Users\user name\Documents\FSF\Programs\SimSounds 4.0" SimSounds.exe

//Hardware Connector

start /d "C:\Users\user name\Documents\FSF\ProSim738 V3\ProSimB738-HardwareConnector" ProSimB738-HardwareConnector.exe

//ProSim737 Displays and Indicators

start /d "C:\Users\user name\Documents\FSF\ProSim738 V3\Displays\CAPT PFD" ProsimDisplay.exe

start /d "C:\Users\user name\Documents\FSF\ProSim738 V3\Displays\CAPT ND" ProsimDisplay.exe

start /d "C:\Users\user name\Documents\FSF\ProSim738 V3\Displays\FO PFD" ProsimDisplay.exe

start /d "C:\Users\user name\Documents\FSF\ProSim738 V3\Displays\FO ND" ProsimDisplay.ex

start /d "C:\Users\user name\Documents\FSF\ProSim738 V3\Displays\EICAS" ProsimDisplay.exe

start /d "C:\Users\user name\Documents\FSF\ProSim738 V3\Displays\FLAPS" ProsimDisplay.exe

start /d "C:\Users\user name\Documents\FSF\ProSim738 V3\PS738ChronoCaptain" ProsimDisplay.exe

Timeout 3

start /d "C:\Users\user name\Documents\FSF\ProSim738 V3\ProSimIOS" ProSimIOS.exe

Closing Files and Programs

Likewise, you can also use a batch file to close files and programs sequentially or simultaneously (kill all).

An example of a batch file used to close programs on the main flight simulation computer (server).

@Echo off

//Alpha Main Server Computer (ALPHA-SERVER-P3)  - 09:38 - 25/08/2023

//ProSim738 V3 – closure batch

taskkill /IM wideclient.exe

Timeout  2

taskkill /IM ProSimAudio.exe

Timeout  1

taskkill /IM PMSounds.exe

Timeout 1

taskkill /IM Prosim737.exe

Timeout  4

taskkill /IM fs2020.exe

  • im specifies the image name of the process to be terminated (for example, PMSounds.exe or ProSim737.exe).

  • @echo on/off defines whether a name or message will be displayed on the console.  It’s also used for other tasks such a script troubleshooting.  I have used it in my batch files because I was told it was a good idea to do so, but if you don’t use the @echo command the batch file still works.  If you do use the @echo command I recommend you use @echo off as this will turn off this feature.

  • The // syntax is used to stop the line from being read by the batch file. 

In the examples, the Taskkill command has been used to close the programs.  Taskkill will cause the program to terminate gracefully, asking for confirmation if there are unsaved changes.

To forcefully kill a process, add the /F option to the command line. Be careful with the /F option as it will terminate all matching processes without confirmation.

An example using the /F command is: Taskkill /F /IM ProSimAudio.exe.

There is debate in the computer community to the validity of closing files and programs simultaneously, as ‘killing a program’ may not allow the program enough time to save information it may be saving during the closure process.

For this reason, I'm hesitant to close flight simulator (or other programs) using a closure batch file without a timeout or delay sequence.  Needless to say, it's an easy process to configure a time delay into a batch file to create a delay before closing each program.

Timeouts

Depending upon your computer specifications, some programs may open and close at differing speeds.  If you want a program is open or close before the next program, then a delay sequence will need to be timed into your batch file. 

The timeout command is used to trigger a delay between the programs, enabling any read/write requirements to occur prior to the next program beginning it closure routine.  The numeral denotes seconds or part thereof. 

Streamlining

Once you have created and saved the batch file, a suggestion is to create a shortcut to the file.  Doing this will enable you to make changes to the batch file such as how the file is executed (minimised or maximised), the position on the screen, colour and font style used, and whether to use an icon for easy identification.  Additionally, by creating a shortcut it enables you to place the shortcut on your task bar.

To create a shortcut, right click the batch file and save as a shortcut.

Using Batch Files and ProSim IOS

ProSim-TS IOS screen in opened to network page.  Rather than explain everything, copy the details and use trial and error to achieve your desired result

If you are using multiple computers, you may want to use the ProSim Instructor Operator Station (IOS) to trigger the opening or closure of programs (via the batch file).  When IOS is configured correctly, you will be able to open and close a batch file on one or more networked computers from one computer screen.

To configure IOS, open the network tab, select add a new action or type and select start program.  In the path to executable file on client box type the file address of the batch opening file.  Choose the start option you prefer and ensure that enabled in checked.

To close your programs, open a second action and type in to the path to executable on client box the file address of the batch closure file.

The accompanying image should be self explanatory.

There are other ways to do this, however, this method is probably the simplest.

Caveat

I am not computer technician.  I have used batch files similar to the examples shown for many years without issues.

Final Call

Batch files are but one way to minimise workload and automate the opening and closure of ancillary programs that are used with flight simulator.  The use of IOS to trigger batch files also enables the user to open and close ancillary programs from the one computer screen (instructor station).

Updating ProSim-AR Visual Flight Model (VFM) Without Loosing Configuration Data

Updating ProSim-AR Visual Flight Model (VFM) Without Loosing Configuration Data

ProSim-AR produces a dedicated visual flight model (VFM) that can be used with ProSim737.  The VFM reflects the aerodynamics and flight parameters of the real-world Boeing 737 in addition, to displaying a visual representation of the aircraft in a selected number of real-world airline liveries.

Read More

ProSim737 IOS - Unconventional Settings

The user interface in the Instructor Operator Station (IOS) allows the user to customise several functions, in addition to enabling or disabling specific options.  Whilst most of the functions are straightforward, there are several options that are unconventional and therefore, probably not clearly understood.

Read More

Installing the Navigraph Database to ProSim-AR (ProSim737)

No matter which avionics suite is used, the navigational database and approach charts will need to be kept up-to-date.  Navigraph (the company) have for many years been the mainstay in supplying accurate navigational data to the flight simulator community.

The navigation database and monthly updates can be downloaded from the Navigraph website, and can either be manually installed to Flight Simulator, or alternatively you can use Navigraph’s FMS Data Manager software to install the files.

This short article will benefit only those using the ProSim-AR (ProSim-737) avionics suite Version 3.  ProSim-AR Version 2 uses a different file structure and navigation path.

Database Files and Installation

Navigraph is the navigation database used by ProSim737.   The database is purchased separately to ProSim-AR and navigation updates (AIRAC cycles) are released monthly.

The correct navigational database for ProSim737 to download from the Navigraph website is: ProSim737 2.24b1 (and above).

When installed the database consists of three files:

  • cycle.json;

  • cycle_info.txt; and,

  • nd.bb3.

Cycle-info.txt is a text file that indicates which navigation database has been installed.  This is the file you need to open if you are unsure of which AIRAC cycle has been installed.  The other two files relate directly to the database.

Once the database is installed or updated, the ProSim737 main module (.exe file) must be run, and the database rebuilt.

To rebuild the database, open the ProSim main module, select Config/Database and Build Database.  The process to rebuild the database will take around 5 minutes.  When completed, the installed database AIRAC cycle number will be displayed.

Database Fails to Update

If the database does not update, there is a possibility that either the downloaded file is corrupt, or more than likely the database has been installed to the incorrect folder structure within ProSim-AR.

In this case, download the required files from Navigraph, uncompress the files to your computer desktop (or anywhere else) and copy the three database files to:

C:/Program Data/Prosim-AR/Navdata.

FMS Database Manager Mapping page.  This is where you select the folder structure to upload the AIRAC cycle to

FMS Data Manager

Navigraph have an installer (FMS Data Manager) which is a standalone program that is free to use.  The Data Manager is quite a powerful program and it’s worth the effort examining what this software can do.

When setup correctly, the installer will download, uncompress, and install the Navigraph files to the correct folder structure with ProSim.  The installer also will create a backup of the existing database (if selected).

Navigraph FMS Data Manager main front page.  This is the page where you select Update to update the navigational database with the latest AIRAC cycle

To ensure that the database is installed to the correct folder on your computer, the Data Manager must be configured correctly.  This can be done a number of ways, however, the easiest and most straightforward way is to setup the folder structure manually.

  • Open the FMS Data Manager and select Addon Mappings.

  • Select the black coloured folder adjacent to the purple coloured box named Manual.

  • Select the correct folder in your computer (C:/Program Data) and save the configuration.

To update the database, navigate back to the front page of the manager and select the check box adjacent to ProSim737 2.24b1 and select update.

ProSim-AR (ProSim737) main menu showing the Config page open with the Build Database page overlaid

Important Points:

  • Whenever you install or update the Navigraph database, rebuild the database and check the AIRAC cycle.

Final Call

Maintaining the navigation database is important if you are to get the most from Flight Simulator.  Navigraph AIRAC cycles are released monthly, and it stands to reason that the FMS Data Manager should be used to streamline the installation process.  Problems, when they do occur, usually relate to the FMS Data Manager trying to install files to the incorrect folder structure.

Changing the Font Style and Colour in CDU

OEM 737-800 font style (courtesy Mick.C ©).  An interesting point about this picture is the condition of the flightdeck which is far from the pristine appearance of many simulators

This article will discuss how to change the font style displayed in the Control Display Unit (CDU). Although the ProSim737 avionics suite comes with a default font style, many enthusiasts wish to change the font, colour and size to more closely mimic the font used in the OEM CDU, or so the information can be more easily read (not all of us are 20 years old…)

The font styles displayed in a simulator are linked to the fonts that have been installed in the computer’s operating system.  Any font style can be displayed in the CDU – as long as the font style has been included in the style library used by Windows.

important Parameters

There are two parameters which depict how a font style is displayed:  the actual font style itself and the CDU config file.  

  • The location of the font style library is C:\\Windows\fonts (Windows 10/11).  

Any of the fonts located in this library can be used to display parameters in the CDU.  Likewise, if you have a preferred font that is not in the library then it can easily be added to the library (copy/paste).

  • The location of the config file is the CDU folder of the ProSim737 avionics suite.  

To edit the config file, you must right click the file and select edit, otherwise the file will open in read only (HTML text).  Once the config file is opened, it will become apparent that all the settings related to the CDU: screen location, screen size, font style, display parameters, etc are recorded in the file.  

With a little experience, it is often easier to make setup changes to the CDU by opening and editing the config file, rather than opening the options box from the CDU display window.  If editing the config file directly, always make a back-up copy of the file prior to making and saving any changes.

ProSim737 options box.  The options box is opened by right clicking the CDU screen and selecting config

Selecting a Font Style and Colour

How to initially configure the CDU (line setting, screen position, frame settings, etc) is addressed in the ProSim737 manual (2012 edition) or in the wikipedia manual.

To alter the font style, open the options box by right clicking the CDU screen and selecting config; the options box is linked to the Windows style library discussed earlier.  To change a font style, scroll through the styles available.  Once a style has been selected, you can change the font size by either changing the size variable associated with the font, or by selecting +- in the ProSim options box.

Another way to change the font style is to open the config file and edit the line entry that relates to the small and large font sizes.  If this method is used, ensure you transcribe the font style and size accurately to avoid errors.

To alter the font’s colour, the config file must be opened.  Once opened search for the following two lines:

<smallFontColor>Lime</smallFontColor>

<largeFontColor>White</largeFontColor>

Type the required colour replacing the bolded section above.

ProSim737 CDU config file.  The lines that need to be altered to change the style and colour are in red.  With experience, other attributes can also be altered, however, always make a copy of the file prior to changing anything

OEM

OEM is an acronym for original equipment manufacturer.  It refers to the hardware and software used in the real aircraft.  In the Boeing aircraft the font colours displayed in the CDU can be readily changed. 

The font style is more or less standardised across the Boeing fleet, however, variations to the font style can be found, and in part depend upon the software option selected by the airline when the aircraft was initially purchased, the U version in use, and the manufacturer of the CDU (Smiths, Collins and Honeywell).

Colour Conventions

The FMC software supports 5 colour conventions: green, cyan, magenta, white and amber.   Bill Bulfer examines the text displayed for each colours in the FMC Guide. The information provided is from U10.2.

Final Call

Changing the font style, size and colour can be easily accomplished by editing the config file either directly from the CDU display or by opening the config file itself.  If a specific style is needed, then this can be added to the Windows style library.

Fabricating a String Potentiometer

Bespoke string potentiometer

String potentiometers are fast becoming the mainstay for those wanting to obtain accurate outputs when a lever is moved, such as the: ailerons, elevators, rudder, flaps, speedbrake, or thrust levers in the throttle quadrant.  This is because the slightest movement of a the string is registered by the potentiometer.

While commercial made string potentiometers can be purchased, they are not inexpensive, and if used will deliver an order of accuracy that isn’t necessary for the assigned tasks.

In the example discussed I I am not using a commercial string potentiometer.  Rather, a standard Bourne 3500-3501 rotary potentiometer has been adapted to use a string.

Requirements

You will need the following items:

  1. Bourne rotary potentiometer;

  2. Plastic housing box;

  3. 6 screws (to secure box lid and to fasten spool);

  4. One nut and washer (to secure potentiometer to box)

  5. A retractable spring-loaded spool and stainless steel ot nylon string;

  6. A cylindrical piece if moulded ABS plastic (or wood); and,

  7. A small dog leash type clip or other fastening device (not pictured).

It’s best to use a CNC machine to fabricate the correctly shaped box, however, any box can be used.  Boxes can be purchased from electronic shops that are used as a housing for interface cards.  These are suitable.

It’s difficult to document exactly how the process is done, but by carefully studying the pictures, you should be able to replicate the process.

Fabrication

  1. Make a small hole in the side of the box for the string.  Ensure the hole enables the string to have some lateral movement.  You may need to attach some type of protection to the inside or outside of the hole so that the string doesn’t rub the plastic.  I have used a soft piece of plastic for this task (Figure 1).  Equally suitable is piece of cork (wine bottle)

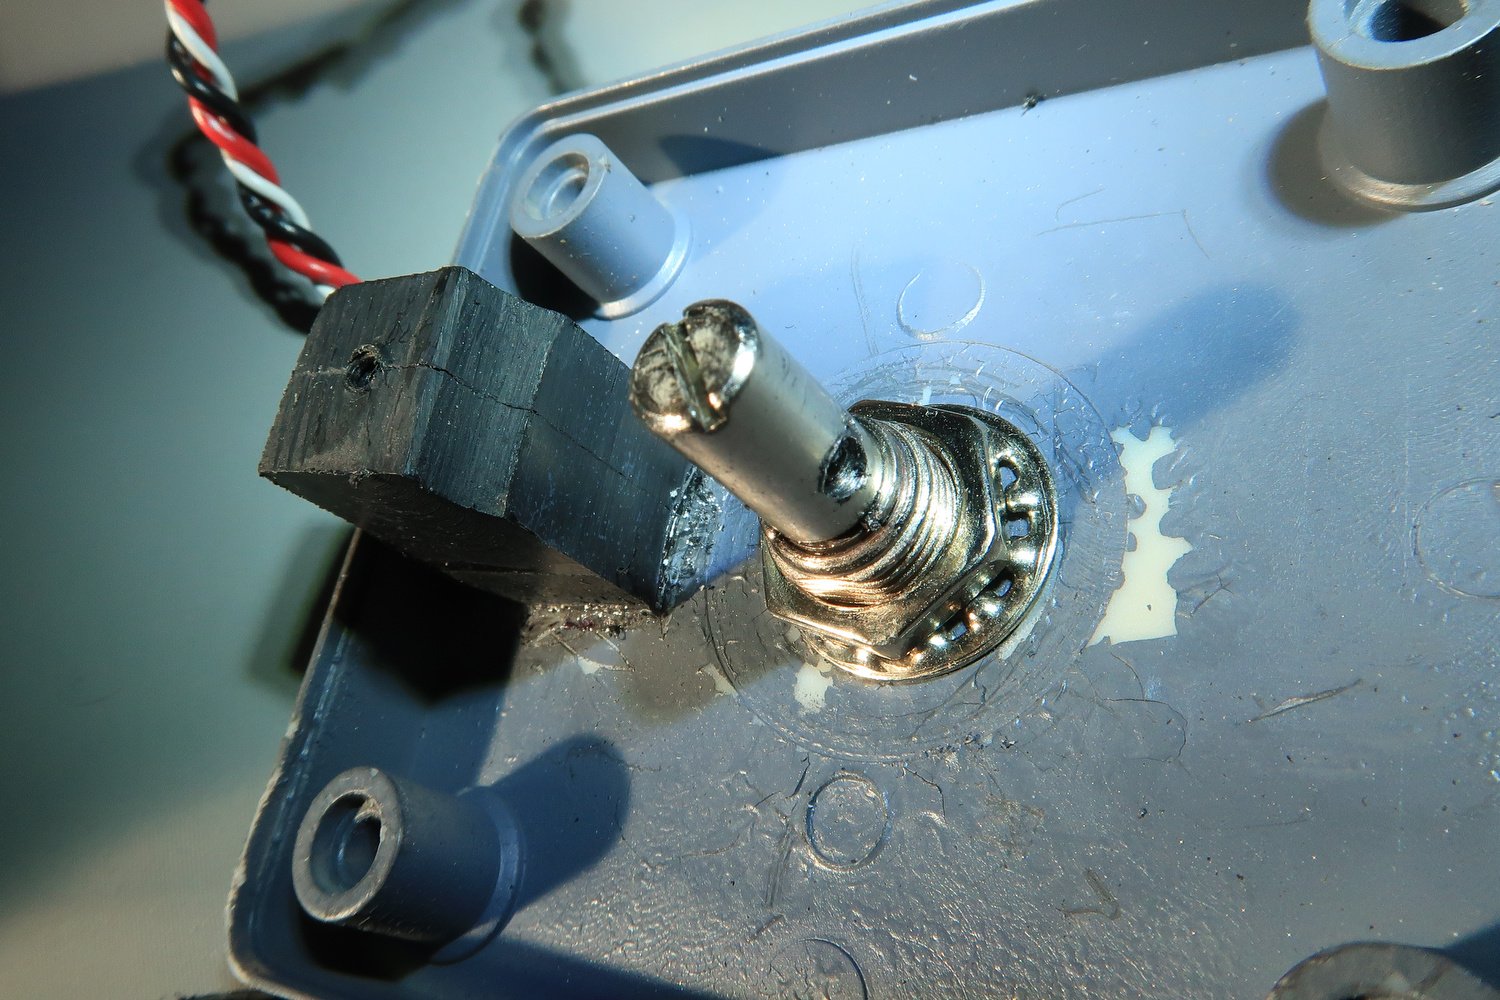
  2. Drill a circular hole in the top of the box to enable the shaft from the potentiometer to be inserted.  Secure the shaft with a nut and washer (Figure 2).  The main body of the potentiometer will be outside the box.

  3. Glue a piece of solid ABS plastic (or wood) to the lid of the box.  Make a small drill hole that enables a screw to be attached.  This screw is used to help secure the retractable spool (Figure 2, 4 & 6).

  4. You must fabricate, from a piece of ABS plastic or similar, a cylindrical attachment that is glued to the retractable spring-loaded spool.  This piece if plastic must a hole drilled that is the same circumference as the shard of the potentiometer (Figure 3).

  5. The retractable spring-loaded spool is glued to the bottom of the box in direct line with the shaft of the potentiometer.  The shaft must align with the hole in the spool (Figure 1).

  6. Drill a small hole into the side of the shaft of the potentiometer and the retractable spool.  The hole should be large enough to enable a small screw to secure the retractable spring-loaded spool to the shaft.  This is done to stop the spool from freely spooling.  When it’s secured, the string when pulled in or out will turn the shaft of the potentiometer (Figure 2, 3 & 6).

  7. When everything is complete, the string should move the shaft of the potentiometer as it is pulled out of the retractable spring-loaded spool.  To secure the spring to the control device, a small clip can be used which is attached to the end of the string.  I have used a small dog leash style clip, but any clip will work.

Photographs

The fabrication as seen in the gallery photographs appear quite rough.  This is because the example photographed was a prototype.  If you are carefully, work methodically, and have an eye for detail, then there is no reason why the end product will not look semi-professional.


Primary Flight Display (PFD) - Differences Between Sim Avionics and ProSim737 Avionics Suites

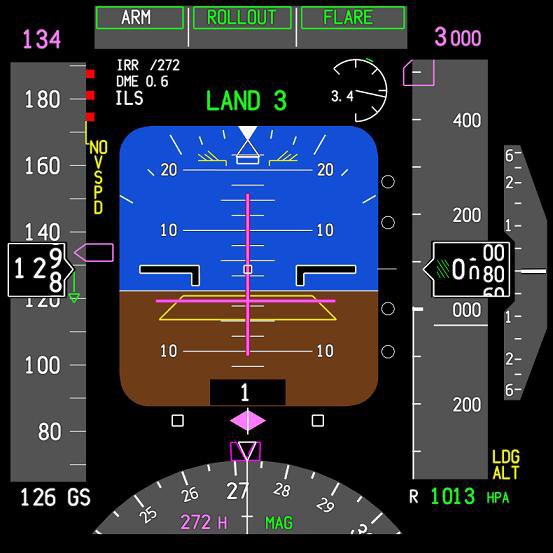
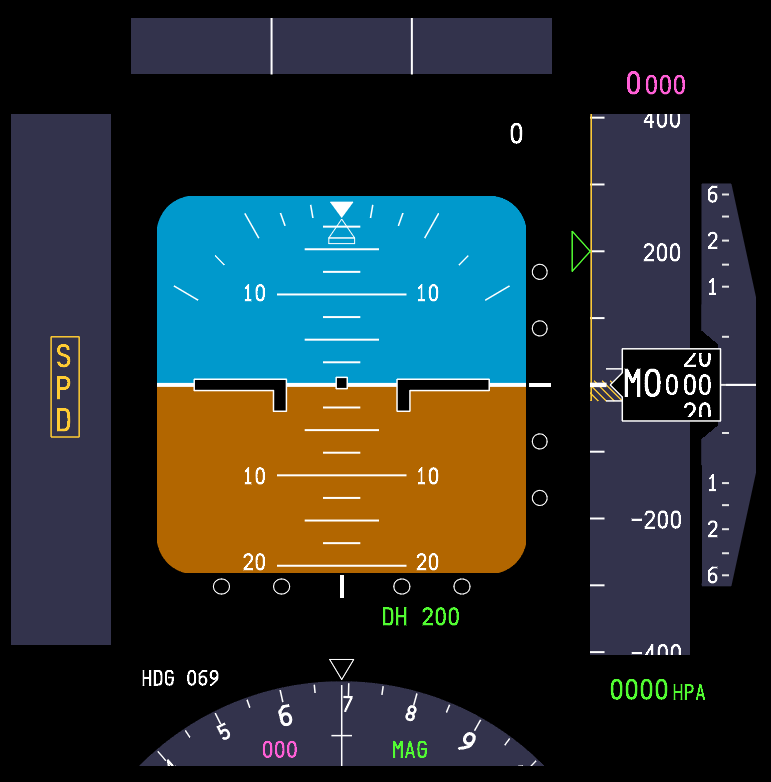
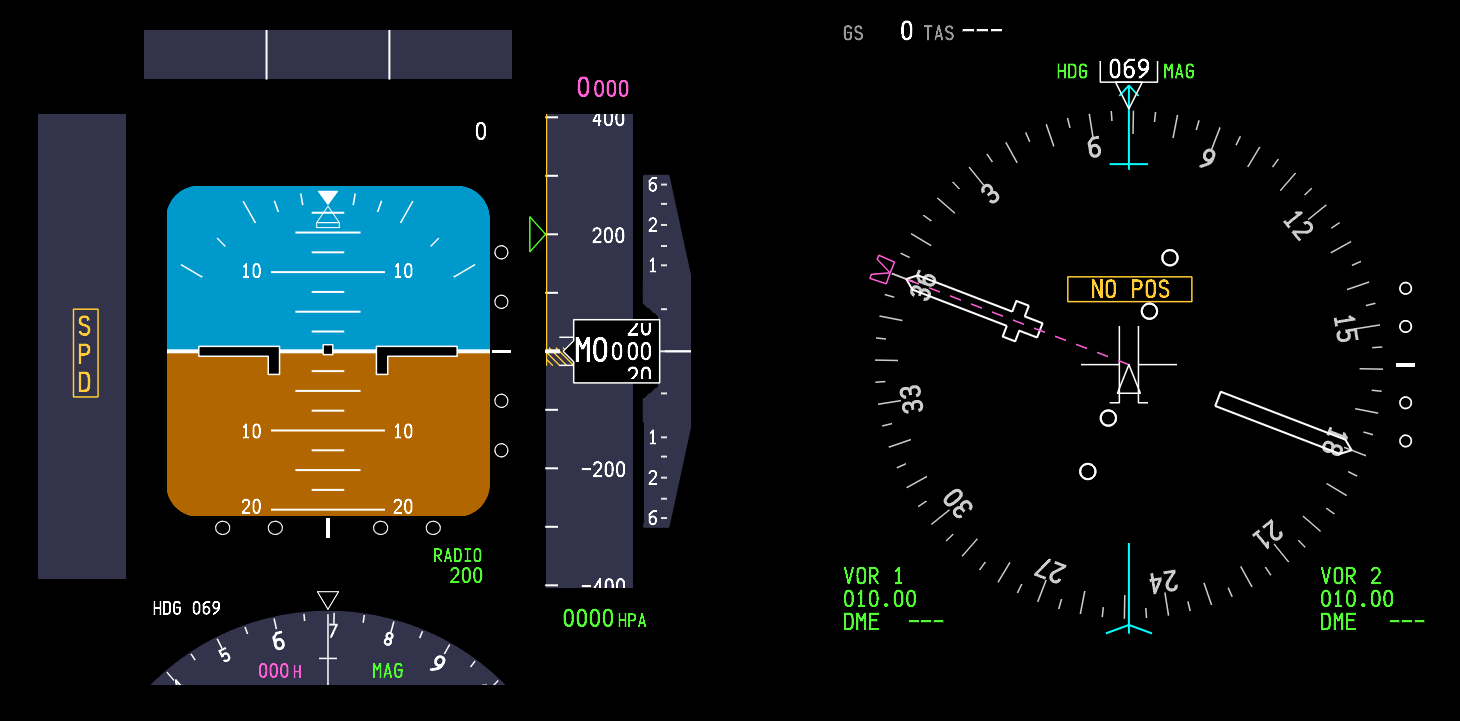
As I work on a slightly more technical article, I thought I would post some images of the Primary Flight Display (PFD) belonging to two of the most popular avionics suites - ProSim737 and Sim Avionics. For reference, I also have also included PFDs used by Aerosoft Australia, Project Magenta and Sismo Soluciones. What is readily apparent is not all suites are identical. Clearly, some developers are using artistic license or do not process the information to be able to replicate the OEM counterpart. Bear in mind when you look at the images, that Sim Avionics and ProSim737 are regularly updated and updates may alter how the PFD is displayed. ProSim737 currently has three releases - Version 1, 2 and 3.

So which PDF accurately reflects the OEM counterpart. It’s a difficult question to answer as the Next Generation encompasses four aircraft types (600, 700, 800 & 900) with each aircraft type using different software and software versions, and this is not discussing company options. Put simply there is subtle variance in how the PFD is displayed.

One aspect that should not be used when comparing suites is the colour; the colour of the PDF can easily be altered by changing the hue in the computer’s display settings.

  • Sim Avionics is owned by Flight Deck Solutions (FDS) in Canada and simulates both the 737 Next Generation and the B777. 

  • ProSim737, developed in the Netherlands, is dedicated solely to the 737 Next Generation.

  • Aerosoft Australia is developed in Australia.

In the interests of disclosure, I own Sim Avionics and ProSim737, but use ProSim737 Version 3.

Important Point:

  • Bear in mind the date of this article (2014). I have no doubt that the display from all avionics suites will change and improve with time becoming closer to the OEM.

A post located on the ProSim737 forum discusses the various PFD differences.  The post can be read here: Comparing the ProSim PFD (thanks Jacob for sending this to me).

BELOW:  Gallery of Primary Flight Displays.

ProSim 737 Glass Cockpit Avionics Suite - Review

prosim 737 version 1 opening screen

The ProSim737 Glass Cockpit Suite is software developed solely for the Boeing 737-800 aircraft and replicates the avionics required for the operation of the flight deck. ProSim737’s beginning was meager, however, the ongoing development, accuracy, functionality and above else, ease of use and reliability, has ensured that ProSim737 has an exceptionally strong following.  

The developers are based in Luxemburg which is why many users of the software are European based; however, flight simulation transgresses geopolitical boundaries and many users of ProSim737 are located in Asia, Australia, New Zealand and North America.

I’m not going to duplicate what can easily be read in the ProSim737 user manual.  The manual outlines much of what the software can and cannot do and I urge potential buyers to read it.

This review pertains to software release Version 1.

First Off - Caveat Emptor (Latin for buyer beware)

Before continuing, there are several flight avionics suites currently available on the market.  They all replicate the basic avionics functionality of the B737.  However, not everything is operational within each suite, and some functions behave differently between suites.  Therefore, it’s a good idea to research what works and what doesn’t before your purchase.  I have a written an earlier journal post addressing this.

Avionics Suite – The Heart

The heart is the most important organ in the human body.  Likewise, the avionics suite is the heart of the flight simulator, and provides the interface for instrumentation to operate.  If the software used is not reliable, robust and well tested, then problems may develop which ultimately will lead you into a minefield of frustration and confusion as you attempt to unravel the intricacies of the Boeing avionics system.

ProSim737 – Overview and Detail

ProSim737 is a complete avionics solution providing the ability to support all displays and logic found within the B737-800.  The software has been designed to run on one or multiple PC's in various configurations interfacing with FS2004 (FS9) or FSX, via a paid and registered version of FSUIPC.  Wide FS is not required, however can be used if networking other add- on programs.

To achieve this, the software is segregated into four broad modules: PS737 System, PS737 Display, PS737 MCP, and PS737 CDU.  Additional modules are PS737 Audio and PS737 Panel. 

I’ll discuss the details of each briefly.  For a more though dissection, I direct you to the ProSim737 website or user manual.

A short video at the bottom of this post will guide you through the various menus of the ProSim737 Systems Module.

PS737 Systems Module

The Systems Module is the main component of the ProSim family and it’s within this module that configuration of the switches, indicators, drives, and gauges occur.  In addition to providing the detailed logic to replicate the following aircraft systems and components: electrical, pneumatic, fuel, hydraulics, heating, fire detection, IRS and master cautions, the module provides access to a web-based instructor station and server that other ProSim737 modules connect to and from.

The Systems Module, because it houses the server, must be installed on the computer running flight simulator.  Likewise, for any other module to operate, the Systems Module must be opened.

PS737 Display Module

As the name implies, this module supports the main visual displays located in the Main Instrument Panel (MIP) that a pilot views when in the flight deck.  The module also provides several additional “virtual” gauges, such as clocks, stand by instruments and a flaps gauge for those flight deck builders who don’t use reproduction hardware gauges, or converted real instruments.

The following displays and gauges are included in the display module.

  • Captain and First Officer Pilot Flight Display (PFD) and Navigation Display (ND) -  various      configurations

  • EICAS display (upper & lower) with fully integrated EICAS messaging

  • Virtual Main Control Panel (MCP)

  • Virtual EFIS display (two)

  • Virtual overhead panel (forward & aft)

  • Virtual CDU display

  • Virtual stand-by instruments (good selection)

If you’re operating a full flight deck with appropriately supported hardware you won’t require the virtual MCP, EFIS, CDU and overhead displays.

prosim 737 virtual mcp

ProSim737 MCP Module

This module controls the Mode Control Panel (MCP) which is the auto pilot system in the aircraft.  The MCP communicates with the logic coming from the systems module to provide information regarding altitude, direction, speed and other auto pilot constraints.

ProSim737 allows the user to either configure the MCP as a “virtual” MCP panel displayed on a computer monitor, or for builders using a hardware MCP, display minimised.  The virtual MCP includes two Electronic Flight Instrumentation System (EFIS) modules in either Honeywell or Collins configuration.

This MCP module usually resides on the same computer as the systems module.

ProSim737 CDU Module

The Control and Display Unit (CDU) is used to assess information from the Flight Management System (FMS).   A user can either use one, two or any number of instances of the “virtual” CDU and each will display identical information.  If a hardware CDU is being used, there is the ability to turn off the “virtual” CDU and display the data on the hardware unit.  All CDU instances are linked to each other via the ProSim737 Systems Module.  It’s usual practice to install and run this module from a client computer.

ProSim737 Audio Module

The audio module is a stand alone module that allows user customised sounds to be played when various preset functions occur, such as when switches are toggled, speeds are reached, etc.  This module is needed to allow GPWS and TCAS cautions, in addition to V1, V2, Vr and altitude call outs.  The module can be installed and run from any computer and links to the ProSim737 systems module.  The module runs as an additive to ProSim737’s internal sound (located in the Systems Module).

The virtual forward overhead panel.  Many switches are functional and can be moved with the mouse

ProSim737 Overhead Module

This module provides the switches, gauges and dials for the forward and aft sections of the overhead.  The module is installed on the client computer and is usually left open full screen, unless you have a hardware overhead installed.  The module supports functionality essential to the basic operation of the B737.

Reliability, Robustness & User-Friendly

When you evaluate a product, it’s “usually” fairly easy to find inherent problems.  ProSim737 is a different beast; since I began using their software I have not had any problems that suggest inherent problems with the underlying software framework.  It’s a pleasing experience when you open software and it “just works”. 

Of course, variances between computer systems and a wide variety of FS add on programs, can cause minor nuisances to occur – this is normal with any software.

To avoid any issues, I advise that all flight simulator add on programs be removed before evaluating a software suite.  Once you’re happy that everything is functioning as it should, add each FS add on in turn, checking to ensure correct operation.  If a problem does occur, at least you will know which program is causing the issue.

ProSim737 is an exceptionally robust software platform and the program has never crashed despite me changing configurations, etc “on the fly”.  

Software Installation

Simplicity and easy of use are the mantra of the developers of ProSim737.  Opening the ProSim737 package will reveal a number of appropriately named folders.  To install the Systems Module you click an executable file and install to the computer on which flight simulator is installed.  The other folders are then copied to the client computer.  IP addresses must be known to allow communication between modules across the network.

You don’t have to open .ini files or configuration files during installation and you don’t need to copy and paste files between folders.  Basic configuration is achieved by right clicking the mouse which opens a configuration screen.  The set-up is uncomplicated and is logically set out.

The only files you need to cut and paste to a folder are the terrain files and navigation database.  Detailed instructions on how to do this are documented in the comprehensive and well-written manual.

prosim 737 Configuration display when using right mouse click - everything is easy to find and configure with minimal time outlay

Learning Curve and Ease of Use

Any new software has a learning curve; however the curve is very shallow when using ProSim737.  You don’t have to be a programmer or have in-depth computer knowledge to install or use ProSim737.  The software is very easy to install, configure and maintain. 

For example updates, which are frequent, do not require you to manually cut and paste a new version download to several folders.  An update button within the Systems Module completes the update task within minutes.  As you open other modules, they each in turn are updated from the Systems Module.

Another example, which shows the ease of use relates to the configuration of various displays provided in the ProSim737 Display Module.  To set-up a dedicated display, you mouse drag the required display to the monitor of choice and then right click the window to open the configuration menu; resizing the display is done using the mouse.  To avoid the problem of the display accidentally changing size in the future, you tick the “freeze constraints” box. It literally takes less than 10 minutes to establish the visual displays in the flight deck!

Configuring Your Switches and Buttons

Configuring buttons and switches to your set-up relatively uncomplicated involving opening a menu in configuration mode, scrolling to find the particular function you need, and then connecting the output type to a specific output.  Granted there is a learning curve, but the curve is low and essential tasks don’t requite extensive knowledge of computer code.  

Similarly, customised audio files can be added, linked and played in the Audio Module.

Navigational Database and Terrain Files

ProSim737 does not provide the navigational database that is needed by the aircraft.  This must be purchased as a separate item from Navigraph.  This is normal practice and all developers rely on Navigraph to maintain the latest navigation package. 

Installing the database requires you download the data and then extract the data, via an executable file, to a specific folder within ProSim737.  You then must build the database which is achieved by pressing a button within the configuration menu.  

Similarly, the terrain files must be downloaded from the ProSim737 website and manually copied to the appropriate folder.

Driver & Hardware Support

Today, there are several vendors ranging from high end to budget level that are replicating B737 hardware and instrumentation.  ProSim737 development is forward based, meaning they understand the need for avionics software to be compatible with as many hardware types as possible.  Flight Deck Solutions, Engravity, Go Flight, CP Flight, SISMO and Open Cockpits are all supported and several types of I/O cards are supported such as Pokey, FDS SYS and phidgets.  FSUPIC and FSUPIC offsets are also supported by ProSim737.

Determining which hardware is selected for your set-up is as easy as checking a box within the configuration screen of the Systems Module.  

Accuracy and Resolution of the Flight displays

You spend a lot of time staring at the various displays, whether it’s the Pilots Flight Display, Navigation Display, CDU or EICAS; therefore, it important that the graphics are of the highest quality possible; nothing is worse than staring at jagged corners, off-putting colours, or blurry lines.  

Although the quality of any graphics is linked to the resolution of the computer screen, if you use a high resolution screen you will not experience any anomalies associated with poor graphics.  The display graphics are crisp and sharp. 

  • To see images of displays navigate to the ProSim737 website.

All simulation enthusiasts strive for accuracy; some to a greater extent than others.  The displays depict what you would see if you were looking at the displays in a real B737 main instrument panel.  Only the very keen you will note the odd subtle difference between the simulation and the real display, and this is often determined to a certain extent, by the cockpit set-up and carrier options you select from within the instructor station.  

For example, the magenta course line in the Pilots Flight Display appeared to be slightly thinner than on the real aircraft, but no sooner had I noticed the disparity that Marty at ProSim737 had uploaded an update rectifying the issue.

What’s important to realize, is that the developer listens and if inaccuracies are noted rectifies the disparity quickly and without argument.  

ProSim 737 Screen grab showing variations of PFD and ND displays dependent on EFIS setting

Precision

Any software must provide precise outputs when its logic is queried; all virtual pilots demand that software outputs be precise in execution.  To date, ProSim737 has lived up to its reputation and I cannot highlight any major downfall in the precision of the software. 

ProSim 737 Screen grab showing variations of PFD and ND displays dependent on EFIS setting

Vertical Navigation (V-Nav)

A common thread in FS forums is that avionics software has difficulty in replicating Vertical Navigation (V-Nav).  This is especially evident with software supplied by Project Magenta and to a limited extent with Sim Avionics. 

ProSim 737 Screen grab showing variations of PFD and ND displays dependent on EFIS setting

The logic used to replicate V-Nav is not simple; it’s complicated, and the variability in V-Nav usage often causes issues to develop when using V-Nav.  The main problem is that the aircraft may not keep within the constraints entered into the CDU.  Often the aircraft will either over fly an altitude constraint or not maintain a entered speed constraint.

From the outset, V-Nav in ProSim737 has worked exceptionally well.  Altitude and speed constraints, if entered correctly, are maintained and the reliability of V-Nav surpasses those of other software suites I have used.

V-Nav Usage

V-Nav, even to qualified pilots can be a challenge to use correctly.  This is one reason why V-Nav should only be used as a guide and not as an absolute.  If V-Nav, for whatever reason does not function in a method you think is correct, then turn it off and use the more reliable L-Nav, Level Change or Vertical Speed functions.

The challenge, I have discovered when using V-Nav is two-fold.  First, you must use it within the designed capabilities of the program, and two, you must learn how and when to operate V-Nav.  If you enter data that the FMS cannot assimilate, such as an altitude that is too high or too low, for the time required to reach the waypoint, then expect an over fly of the entered restrictions.  This is not the fault of the software, but the fault of the user.

Display Lag

Display lag is term coined to explain the staggering of a display due to information overload, information bottleneck or lack of computer graphical power.  It typically manifests itself when a lot of information is required to be displayed at an identical time that computer processing is required.

For example, another software suite I have used displayed staggering on the altitude tape in the Pilots Flight Display (PFD) when ascending and descending with the “all waypoints” selected from the EFIS.  The staggering stopped when the “all waypoints” were deselected.

I have yet to experience any display staggering with ProSim737, even with the terrain simulation display activated.  

Weather & Terrain Display Functionality

The weather and terrain display function, which is activated either by pressing WXR or TERR on the EFIS unit is functional in ProSim737, however, the weather display is inaccurate and looks very outlandish in its “blocked in” colour display.  

I’m lead to understand that the weather functionality present within other software (Sim Avionics), reads directly from weather depicted by FSX, and then only presents a rough indication of what the weather maybe like at that particular time; it certainly does not mimic and display what the aircraft is actually flying through or about to fly through.  

I am hoping that the developers at ProSim737 will develop a radar module that actually reads the exact weather depicted in FSX and display this weather in a way that is similar to the real radar in the B737.  At the time of writing, the weather displays only in solid colours and does not mimic how real radar operates.  I hope that ProSim737’s developers improve this in due course.

ProSim 737 terrain files (two choices)

Two Terrain File Resolutions

Pressing the terrain (TERR) button on the EFIS unit, displays a graphical representation of the surrounding terrain on the Navigation Display.  There are two variations of the terrain graphics available; one display is slightly blocky and the other display is more detailed.  To select which display is active, right click the screen with your mouse and tick the appropriate box in the configuration menu.


Compatibility of Aircraft with ProSim737

It's always been a concern to what add on aircraft you can use with a particular avionics package.  As an example, Sim Avionics provides several aircraft .cfg files which have been tweaked to their software.  You load the particular aircraft.cfg file for the aircraft you are using and any vagrancy between the aircraft and avionics software is rectified.

ProSim737 has taken a completely different approach and designed a flight model called the JetStream 738, which is tweaked to operate flawlessly with ProSim737.  Of course, you don’t have to use the JetStream if you don’t want to; the default B737 can be used as can the PMDG B737 FS9 version with flight logic removed.  

I will review the JetStream738 in a separate journal post.

CDU - Background Software

No review of any avionics software is complete without a short segment on the CDU.

The ProSim737 CDU module is the controlling software that provides the intelligence behind the CDU.  It's amazing what this software can do, and do so with reliability and consistent behaviour.  More importantly, the software does not crash, even when incorrect data is inputted to the unit.

Many pages associated with a commercial CDU are modelled and updates continue to add new features and improve existing functionality. 

In the real B737 aircraft, not all CDU software is identical.  There are different software versions and each version has slightly different functionality; it’s the decision of the airline to which software version is chosen.  Likewise, not every company producing avionics software models the CDU identically.  In some respects, it depends on which software edition the developer has chosen to replicate. 

Unfortunately, many developers choose to not replicate something or to not provide full functionality.

Often CDU menus and pages may look similar in appearance, but you will be disappointed when trying to access a feature that appears to be modelled but has no functionality.  Some suites offer far greater functionality than others.  I believe ProSim737 provides more functionality than other higher end CDU software available, and more functionality is regularly added through software updates.

Some of the basic features modelled by the CDU software are:

  • Indent page on start-up (weights, fuel, fuel reserves, cost index, cruise altitude, etc)

  • Approach reference page with VREF selection

  • Route, LEGS, Arrival, Departures & Holding pages (user controlled including approaches, STARS, SIDS & transitions)

  • Progress pages (fuel, distance to go, ETA, wind, crosswind component, cross track error, fuel prediction etc)

  • Vertical Bearing Indicator (VBI)

  • V-Nav & L-Nav compliant (climb, cruise and descent)

  • Ground Service - push back

  • NAV/COM radio reference page (ADF, ICAQ, VOR & ILS data) & search

  • ACARS (future installment)

  • Captain & First Officer EFIS control

  • OAT

  • SIM MAINT page (separate commands to control SIM instead of using keyboard) such as pause, freeze & re-set FMC.

The software lacks the ability save a flight plan directly from the CDU; you must use the instructor station to save a flight plan. Also, it’s not possible to reverse a route from the CDU.  It would be helpful if this functionality can be implemented.

The software is compatible with CDU hardware produced by Fly Engravity and Flight Deck Solutions.

prosim 737 ios showing CAT visibility and push back & failures menu

Instructor Station

The instructor station included with the software is a web-based station, meaning you type in the appropriate address into the browser web bar and the instructor station opens on any computer connected to your network – even a laptop.  No other software is needed.

The instructor station is comparatively simple in layout, yet functional.  Without repeating the user manual, which outlines in detail what each section comprises, the station displays the following menus: Quick Start, Cockpit Set-up & Carrier Options, Global Database, Situations & Positions, Company Routes. Flight Plans and Failures.

prosim 737 ios failure screen

Two Instructor Station functions  deserve mention

Company routes allow you to store and manipulate routes you have loaded into a specific folder within ProSim737.  These routes, if not manually built using the CDU and FMS and saved to the instructor station, are usually downloaded from on-line route generators.  As the station has a built in editor these routes can easily be edited and re-saved.  You can also download from the station to the CDU any selected route.

The situation menu I find particularly useful.  Here you can instigate push back, execute day or night and switch to real time at the push of a button.  You can also define visibility as CAT I, CAT II or CAT III.   This can be done on the fly while the aircraft is flying.

The failures menu can be set-up to allow any number of single, multiple or cascading failures to occur either within a predefined time or at random.

ProSim737 Start-up Sequence

Ease of use and simplicity are important to ProSim737 and this mantra is carried through to the operation of the software.  Opening the ProSim737 Systems Module and other associated modules is exceptionally fast and the programs close with minimal lag time.  This is in stark contrast to other software suites which seem to take an eternity to open the various instances of the same program.

To simplify the start-up process when opening a flight session on my two networked computers, I’ve created shortcuts to the required ProSim737 modules and pasted them to the windows menu bar.  This is my start process (included are some add on programs I am running).

Server Computer

  1. Start PM Sounds

  2. Start ProSim737 main module

  3. Start ProSim737 MCP module

  4. Start ProSim737 Audio module

  5. Start FSX

  6. Start FSRAAS2

  7. Start Throttle Quadrant Phidgets

Client Computer

  1. Start PM Sounds

  2. Start ProSim737 Display (Captain PFD& ND)

  3. Start ProSim737 Display (First Officer PFD & ND)

  4. Start ProSim737 Display (EICAS)

  5. Start ProSim737 CDU

  6. Start ProSim737 Overhead Panel

  7. Start ProSim737 Audio module

  8. Start ProSim737 web-based instructor station

The time to start each program is no longer than 4 seconds; FSX takes the longest time to load.  Closure time is similar (mouse right click/close) from the menu bar.  To decrease closure times and mouse movement, a closure batch file can be created.

What is lacking & Possible Improvements

There will probably always be something lacking no matter what software you use, and some enthusiasts are never happy until they have everything – even if they never use or need it.  

The Aircraft Communications Addressing and Reporting System (ACARS) is not supported, although I believe this will be addressed in future updates.  I’ve already discussed some missing functionality with the CDU and touched on the inadequacy of the weather radar.

For the most part, all essential functionality is present within the system, although it would be nice to have more CDU functionality and a list of functions the CDU is capable of.  Currently no such list is available, and if using an official FMC guide it can be "hit & miss" working through he menus to see what is functional.

Several users have commented on the forum, that the %CG calculation in the CDU usually remains the same despite changing the aircraft's overall weight.  Users of TopCat pre-flight software have reported variances in %CG between ProSim737 and TopCat.  This variance may suggest an issue in the calculation of %CG which needs fine-tuning.

The list of hardware supported by ProSim737 is long and continuing to grow.  This said, I have noticed that the CP Flight ATC/Transponder unit which supports full TCAS operation is only partially functional within ProSim737.  TA/RA is inoperative.  Although the responsibility for this incompatibility probably rests with CP Flight, it would be very nice if ProSim737 attempted to rectify this.  CP Flight hardware is used universally and full functionality should be implemented across the complete CP Flight range of hardware.

Continual Development

In my opening paragraph I stated, “Avionics software is the heart of the simulator”.  Therefore, it’s pleasing to see continuing development of the software; updates that add or improve on existing functionality are released on a very regular basis.  Furthermore, the software designer is open to suggestions from users on how to enhance the software.  Shortcomings, when observed are quickly addressed.

One Aircraft - Mono Focus

One very important attribute of ProSim737 is that the developers only produce software for the B737 aircraft.  This means that they focus 100% of their time on replicating this airframe.  Other companies develop software for multiple aircraft and try to incorporate duel systems within their software.

Compromise & Expectations

It’s a fact that human beings rarely enjoy compromising – we want everything and we want it now. 

Some of you maybe "thinking" that ProSim737 has issues that need rectifying.  I'd be lying if I told you everything was 100% perfect - of course there are issues, but these are minor and differ depending upon your set-up.   But, in comparison to other software suites on the market, I feel confident stating that ProSim737 has less issues and rectifies niggling problems much more quickly than their counterparts.

If your expectation is to have software that is absolutely perfect without any glitches at all, then I'd strongly suggest that building a flight simulator is not really your calling. There are so many variables with computer equipment, drivers and the like that minor issues will pop up from time to time.

Developing software that replicates the B737 avionics to the tenth degree is a noble thought, as is maintaining a reasonable price.  However, what builders often fail to remember is that the Boeing software cost millions of dollars to design and implement with a solid team of developers.

ProSim737 delivers an exceptionally good package that is more advanced and feature-rich than its counterparts.  It’s not perfect, but the developers strive for perfection and improvements continually are being released on a regular basis.

Documentation and Support

The definition of osmosis is; “The gradual, often unconscious, adsorption of knowledge or ideas through continual exposure rather than deliberate learning”.  In the previous software suite I used, “osmosis” was very much the method of learning, as were mistakes, wasted time and frustration.

It’s good to see that ProSim737 includes a very detailed and well-written instruction manual which explains how to do nearly everything you need to know to configure the software to your set-up.  Failing this, there is a dedicated interactive forum that is very regularly reviewed both by users, beta testers and ProSim737 staff. 

If a problem does occur, support can be reached either by Private Messaging or e-mail.  

You will not be left “high and dry” by the developers.  They are very enthusiastic about their product and keen to help wherever possible.

A short video will guide you through the various menus of the ProSim737 Systems Module.


Recommendation & Overall Score

ProSim737 is a stable, well tested and tried software platform that provides most of the real-world avionics of a B737 jet-liner.  The software is easy to install, use, and does not require advanced computer knowledge to get you in the air.  Furthermore, a vast collection of hardware and interfacing cards are supported and new functionality is added on a regular basis.

At the time of writing, if you purchase ProSim737, the software includes full support and updates for an unlimited time period. 

This has been a long post, and if you have read this far, I hope you have gained some incite into ProSim737.

To download a free trail version of the software, visit their website – ProSim737.

My Rating is 9.5/10

Please note that this review is my opinion only and is not endorsed.

Update

on 2014-02-12 23:38 by FLAPS 2 APPROACH

  • Please note that since this review has been written, ProSim737 developers have released several updated versions of the software and three incarnations; Version 3 being the latest (2024).

  • The content of the review is outdated and has been left on the website for historical interest.

Avionics Software - Selection and the Future

south West at phoenix sky harbor airport (aeroprints.com, N643SW Boeing 737 Southwest (8401799774), CC BY-SA 3.0)

Southwest Airlines is the largest low cost airline in the United States, and has maintained its success on a simple business model - its decision to fly only one type of aircraft, the Boeing 737.  By streamlining their fleet to only one aircraft type, savings can be made in maintenance, logistics and support.

Southwest only need to employ maintenance personnel knowledgeable on one aircraft type, pilots do not need to be cross trained, and more importantly flight and support crews can be airlifted anywhere to begin work immediately should a problem arise.  There is no time delay waiting for a type pilot or engineer to be found.  In the airline business, lost flight time means a loss in revenue.

So what has this got to do with flight simulator or avionics software suites?

Avionics Software Suite – What’s this?

Before proceeding, the avionics suite is the software that controls the aircraft’s avionics systems within the simulator.  The avionics suite controls nearly everything associated with the simulator that is automated and includes among others: the integration of the Main Instrument Panel (MIP) and Main Control Panel (MCP) and the projection of this data to the Navigation Display (ND) and Pilots Flight Display (PFD).  The software does not replace the main flight simulator platform (FSX or whatever), but acts as a separate platform.

It’s important to realize that this software is VERY important.  It is the backbone of any simulation and directly controls whatever flight model you are using.  Any software used must be accurate, robust, replicate real aircraft systems, be reliable, and be able to replicate its outputs on a consistent basis.

There are two broad types of suites – those that can be used in a full flight deck simulation and those that are more suitable to a desktop set-up.

State of Play - Software Contenders

Historically, Project Magenta (PM) was only one contender if you wished to tackle the task of building a 737 simulation.   At the time, the software was complicated and required the user to network several computers.  The software developed by Project Magenta initially led the way, laying the building blocks for others to follow (bravo to PM).

In 2012, contenders are several: Project Magenta, Sim Avionics (Sim-A), Orion, Aerosoft Australia, Flight Deck Software, ProSim737, Precision Manuals Development Team (PMDG), i-Fly and several lesser known companies produce software that emanates the avionics of the B737.  Other software suites “pop up” on the horizon from time to time as talented software engineers attempt to enter the marketplace.

Which Avionics Software Suite Should I Use?

This is a personal decision and I’m not going to publish a “tit for tat” discussion to which suite from which company is better or worse.  I will say that each company’s software brings different aspects of the flight deck to realization – some with greater accuracy, detail and finesse than others.  Before you purchase a suite, it’s vital to investigate exactly what that suite can and cannot do in relation to the hardware you have installed in your simulator.

Software suites offered by rival companies are NOT identical to each other.  Some developers have added functions and displays to their software in an attempt to make them more user friendly, or to be used for multiple aircraft types.  Other developers try to replicate the displays in the real aircraft.

Before purchase, you should identify what aspects are important to you, will work your simulator, and represent the functionality you expect.  Flight deck building and simulation is often very much about compromise.

Just because software is expensive or inexpensive, doesn't imply it's well tested and stable; try and see beneath the marketing veil.  Some of the smaller lesser known software suites are very good and provide excellent value for money.  For example, Aerosoft Australia has released a very competitively priced avionics suite which is more than enough for the average simmer who does not want to use an overhead panel.

Reliability, Repeatability, Accuracy, Expectations and Support

The most important facet of any software is reliability and repeatability; both mutually support each other.  Unfortunately, not all suites are reliable or have the ability to repeat defined outcomes.  Some high end and expensive software suites are plagued with teething problems, which for the most part, are left to customers to solve or report to the developer, in the hope that an update will rectify the issue.

As discussed earlier, software suites are not identical in functionality or appearance, even though in theory should replicate what is found in the real aircraft.  Although some of these variables are aesthetic, such as font type, size and colour; attributes that many virtual pilots deem important.  Other issues are not aesthetic and may relate to the available functionality of a particular system – such as the Flight Management Computer (FMC).  Depending upon the developer, upgrades to a software suite maybe frequent or only once every six months.

I have reviewed Sim Avionics in an earlier post.  ProSim737 will be reviewed shortly.

Expectations

It’s important to understand that replicating all the systems of a fully functional 737 is a continual challenge.  Real simulators can cost upwards of 15 million dollars and expecting the same level of performance, reliability and repeatability from a software suite, for less than $1500.00, is not reasonable.  Add to this the vast array of different computer designs and installed hardware and you can easily see why minor problems can occur.

EVERY software suite has teething and minor issues.  This said; please don't go away with the notion that every piece of software is a nest of problems - this would be incorrect.  What is important, is to go away with the notion of "reasonable expectation".

Some developers, in an attempt to work around complicated issues have chosen not to implement certain systems or parts thereof.  These same systems in another suite may work perfectly or not at all.  For the most part, problems stem in the accurate development and execution of Vertical Navigation and the integration of a “fully functional” Flight Management Computer (FMC).

Support from the development team of the suite you have chosen is paramount.  Many issues can and are easily solved.  But a prompt and efficient support base, regularly visited and updated by the software developers is essential.  It also should be noted, that many developers work closely with users to rectify teething issues within their software.   

Connectivity with Micro$soft Flight Simulator and Prepar3D

Most virtual pilots use FSX or the earlier FS9 as their baseline program.  These programs are no longer being developed or supported by Micro$oft and are quite ancient with regard to much of their software architecture.  Other than X-Plane and a few other “no shows” the only program being developed as a baseline program for flight simulator is the Lockheed Martin Prepar3D.  I am not using Prepar3D, however, I envisage I probably will be within two years.  It’s important to ensure compatible with what well may replace FSX.

The Future

What does the future hold?  As computers became faster and software advances continue, almost exponentially, I envisage that avionics software will become more sophisticated and refined in how fluid they interact with, and parallel real aircraft systems.  If the recent release of PMDG’s 737 NGX is anything to go by, it’s only a matter of time.

Two Camps

Presently, there are two camps; desktop users and those using partially or fully developed flight decks.  This is not including turn-key type full LEVEL D simulators.

PMDG, closely followed by i-Fly have taken the limelight in the production and release of the NGX. However, the NGX simulation is more suitable for desktops than a flight deck.  I-Fly has taken a step forward, but only has partial functionality to cater to flight deck builders.

Technology doesn't remain static and improvements will drive more companies to produce dedicated software; the days of one or two companies reigning is quickly paling.

Market Share

Historically, Project Magenta was the suite of choice for those wishing to develop a fully functional flight deck, however PM is no longer the “strawberry fox” and is now showing its age, being surpassed by new “high end’ contenders such as Sim Avionics and ProSim737.  Put simply, these new contenders produce software that is more reliable and sturdier, easier to understand, install, and configure, and can operate on a minimal number of networked computers.

Project Magenta in an attempt to regain market share has also extended its reach to support different jet aircraft including general aircraft. Sim Avionics has followed suit; in addition to the 737-800 NG, they also produce avionics suites for the 747, 767, 777 and the A320.

Southwest's Business Model

Other than i-Fly with its duel platform approach, and a few lesser known manufacturers, the only “high end” company dedicated ONLY to the development of the B737 for use in a full flight deck is ProSim737.  Like Southwest Airlines, ProSim see benefit in producing only one avionics suite, doing it to the best of their ability and providing continued development until, if you excuse the phase “it’s as good as it gets”.

Leaders and Followers

The future is blurred, but in relation to a fully functioning B737 flight deck simulation, I believe that ProSim737 and Sim Avionics will run “neck and neck”.  Presently, ProSim is more advanced in some aspects than Sim Avionics; but Sim Avionics comes under the mantle of Flight Deck Solutions which is a forward-moving company with a history of aggressive and progressive development.  I don't expect Sim Avionics will sit idle and wither on the vine...

Leadership in desktop simulation will probably be left to the current two major players PMDG and i-Fly; both which will “heckle” for the leadership, with i-Fly probably keeping feet in both camps.  

The other "lesser" contenders will always be there, and this is a good thing.  Competition drives development and improvement, which translates to increased functionality, greater simplicity and more stable software.  This can only benefit the consumer - YOU.